
Start a Blog in 12 Steps – And Start Making Money
A world of changes have passed through the blogging world since I started this blog in 2016. All those changes have made this marketing channel even more popular among freelancers and alike in terms of making a living from writing.
As easy as it sounds, there are several steps to take before you start making money with writing. This is a post about stepping into the realm of blogging and showing you how to make your blog functional, whether you are considering selling your words or just want to share your stories with the world.
Trends change with time, niches get popular, and then fade. Products come and go, BUT blogging fundamentals stay the same. Logistics on how to start a blog stay the same, so I want to give you the core basics on how to start a blog.
I’m covering all the technical details you have to do before you start a blog and giving you a recipe on how to become a blogger. There is no big secret about it–you have to offer value to your audience. Write about topics that interest people, solve their problems with genuine advice, and motivate them to learn more.
What is a blog?
Let start with the basics. A blog is a website that is filled with written content, aka blog posts.
The goal of starting a blog is to express yourself through writing and share your experience with people. While this started out as a hobby way back when today you have a great opportunity to make money blogging.
Want to get more blog subscribers and build your fan base? Download my free guide "Get Your First 100 Fans" Click here to get the guide.
Your blog is a website that needs to be constantly up and running. You need to work on regularly writing new blog posts in order to gain the attention of people and, eventually, benefit financially.
You can make money by starting a blog, but that’s totally up to you. It takes some time and serious dedication at the beginning of your blogging journey, but it can be quite profitable.
Not everybody starts a blog to make money. It can be a hobby for you or a profitable business that you can do from the comfort of your home without being stuck on a nine-to-five treadmill. You can even side hustle it and if you put in the effort, in the beginning, your own blog can be a great source of passive income.
Overall, making money blogging is no myth.
Why should you start a blog?
At what point did you consider starting a blog? What led you to perform a how to start a blog search on Google?
Whatever your reasons might be, it’s good that you landed here. We’ll go from the core mission of starting a blog to making a successful blog.
But, first, let’s go through the many pros of starting a blog.
Boost your writing skills by starting your own blog
Some people aren’t even aware of their creativity until they start translating their thoughts on paper, or, in this case, on a blogging platform.
Writing blog posts is a great way to realize what’s your writing style like and if you like it. If you have never been passionate about writing, you should definitely take your first blog post slowly and give it some thought before you publish it. The main thing is to be genuine when writing.
Being genuine is a prerequisite for you to find your voice, and for your blogging journey to take off.
You can always see what other successful bloggers are doing, what blog post topics they are covering, and how people react to them. This will help you see what people want to read about, what they like more, and what they like less.
It can be hard to start writing because there are so many competitors out there, and that’s where the overwhelm kicks in. How can I possibly compete with people that have had their blogs for a decade, and have been successful since then? Well, you can compete. Because what separates you from the crowd is your personality, your approach to topics, your experience, your knowledge, and the passion YOU bring.
The only thing you need to do to get better at writing is to start writing. And, today it’s super easy, because there are many grammar checkers, like Grammarly or ProWriting Aid, that you can use. And most of them will not only correct your potential grammar mistakes but will also give you much-needed feedback about the tone that you’re carrying throughout your blog post. You can go for a business-like tone of voice, you can go for informal, you can go for optimistic, friendly, and so on.
So when we get to you actually writing your first blog post, don’t freeze, just write, write, write, and over time, your writing skills will only get better.
Boost your technical skills by starting a blog
While you improve your writing skills, you’ll improve your technical skills as well.
Whether you decide to start a blog about something you’re passionate about, or about something business-related, the more you write about it, the more you’ll learn.
You’ll have a deeper foundation about the topic because starting a blog will require active involvement in your blog’s niche. Regularly writing about a specific subject will require you to expand your horizons in order to have exciting, new blog post ideas.
This is a great way to connect with your blog niche on a higher level, to really improvise, and stand out by presenting your take on over-saturated niches.
The blogging world is a fast world, and the way to keep up is by always staying up to date. By always searching for new blog post topics, you’ll learn more without necessarily being aware of it. Which is really a plus.
Share your story with the world through a personal blog
A personal blog, most popularly known as a lifestyle blog, is a blog all about you. You’re the subject of it.
You’re the main character.
These types of blogs start out with one main niche, or a few connectable niches, just so you can gain an audience, and then you can expand to multiple niches with YOUR PERSONAL STORY being the accent of your personal blog.
Starting a blog is a great way to share your thoughts. It’s a great way to let all your thoughts out onto the real world, and save your headspace for new creative thoughts and ideas.
Sharing your experience, your thoughts, and your life with the world is very brave, and while it might be an outlet for you, it can also be something encouraging for the readers.
Everyday life situations are things people rarely talk about these days because we’re all so busy all the time, and we don’t pay attention to these things that we daily go through. Most of us are on autopilot. And when you’re on autopilot, you don’t stop to smell the roses. You don’t appreciate the roses. Because the roses are there every single day. Starting a blog is a great way to change that.
As a successful blogger, you can have an impact on people. You can raise awareness about the beauty of everyday situations, or the lessons we can extract from them instead of pushing our everyday stress under the carpet.
Whatever it is that you have to say, someone will relate to it.
This is a great way to become conscious of your emotions and opinions and to inspire people to do the same.
Connect with like-minded people through your new blog
If you’re searching for like-minded people, starting a blog can help you build strong connections. You can build a connection with your neighbor across the street that you never really talked to, or you can make a connection with a person that’s on the other side of the world. It really doesn’t matter because your blog can be a gateway to a world of new people that value the things you value.
When you start a blog, you’ll get to engage with your audience, and with other bloggers in your niche. This is the first step towards building a great community. Great friendships. Or great partnerships.
A world of change just might be one blog post away.
Establish recognition by starting a blog
If you’re starting a business, or if you own a business already, but you’re struggling with finding clients, you can start a blog to gain some recognition. Every business needs good marketing to take off and become profitable, and what’s better marketing than starting a blog that relates to your field of work?
Start a blog and use it to position yourself as an expert in your field of work.
Even though it takes some work, as everything does, your business and your professional status can really benefit from this. The people that start engaging in your blog posts might ask you for professional advice tomorrow. They might hire you a month from now. You never know.
When you’re truly good at a certain field, why not start a blog about that field? Your expertise will radiate through your content.
People will stumble upon you through a search query, and if you provide some value for them, they will stick around. Once you gain trust, your audience of two will become an audience of many. Good things spread fast.
So help yourself by helping your career, and by that I mean, start a blog today.
Make money blogging
This is the biggest selling point – make money by starting a blog. Work from home. Heck, work from anywhere in the world. You have to know that you won’t become a super popular, successful blogger overnight, but if you start writing and stay consistent, you just might find yourself running a profitable blog.
This is a fun way to express yourself while actually earning an income. And as I’ve mentioned, you shouldn’t just recklessly quit your job right away because starting a blog is a process.
You mustn’t forget that you need a secure source of income to pay your rent, bills, food, basically all living expenses.
So don’t look at this as a way to get rich quickly, because that’s not what starting a blog will provide for you.
You need to work at this like you would at any other job. If you invest your time and effort, you’ll have a shot at having a blog income from this in return.
Commitment is key. Just temper your expectations because I know all this sounds easy and can get you psyched, but nothing will happen overnight. In order to avoid becoming disappointed, look at this as what it is – a job opportunity that you need to work hard to get.
Now let’s jump into the technicalities, so your psyche doesn’t wear down.
Want to get more blog subscribers and build your fan base? Download my free guide "Get Your First 100 Fans" Click here to get the guide.
Technical side–making it live and online
Today we have a practical lesson. It’s time for you to do more than just read my blog posts; I want you to take real action.
You can have your own blog set up in less than an hour. And I’m going to make it as easy as possible because there is no secret to how to start a blog. Instead of taking shortcuts that you will have to fix or alter later, I’m going to take you through the EXACT process I used to set up this very website.
Step 1 – Choose a Niche
There are several ways to choose your niche and it starts with the purpose of your blog. My very first blog was stories about how bad I was at dating. I never expected it to grow, let alone become the #1 search result for “get a girlfriend” for a time.
Everything about that first blog was just about keeping an online diary with no commercial intentions. This blog is the opposite. I started Serve No Master with the hopes of a building a business with the option to exit one day if I want to retire. That’s why the site isn’t just my name.
There are three main driving forces behind most blogs. Let’s see which one best fits your goals.
Passion
With a passion blog, every post is written based on your personal desires. Who cares who reads the blog as long as you write about a topic that you find interesting today.
This is how blogging started and was certainly how I started way back in 2007. If you don’t care if anyone reads you blog let alone generating revenue, then you can choose any niche you want. You can write about any topic because it doesn’t matter.
Just be aware that you can’t change your mind later. It’s extremely hard to change niches. Tha’ts why this is the first first step in the process. It’s foundational.
When I changed from a passion blog, I had to change hosts, domains, blogging platform, and how I wrote all my content. It was a massive undertaking that you don’t want to do twice.
People
The second way to build your blog is to write about topics that are popular. You don’t care what you write about as long as a lot of people will see your content. This is how most TikTok channels are build. They get massive, general audiences that have nothing in common with each other.
This is great for popularity but very hard for profitability. Many niches that are very popular are very hard to monetize. When you have a wide audience, like “comedy.” Your traffic isn’t very valuable. Because the people have nothing in common with each other, an advertiser is only able to appeal to a small segment.
That means they might pay for only 5% of your traffic, because the other 95% isn’t their demographic.
Again, if you just want to be Internet famous or get a lot of readers that’s absolutely fine. Just know in advance that traffic doesn’t always lead to large profits.
If this is your path, you can find blog ideas by searching for keywords on Ubersuggest and then writing about whichever topic has the highest search volume.
Profits
If you’re trying to build a real business, whether you want to make side hustle income or replace your salary, you’ve come to the right place. We can be very strategic with finding the perfect niche for your blog.
Make a list of potential categories that you are interested in writing about. For example, I’m interested in fitness after 40, men’s health, shaving with a safety razer, parenting, homeschooling, surfing, living abroad and video games.
Each of these is a completely different niche and I don’t write about any of them on this site. This site teaches people how to build online businesses so they can pursue their own hobbies and dreams.
There are many ways to make money from your blog, which we’ll cover at the very bottom of this page, but I’ll give you the shortcut. The most profitable ways to make money from a blog are selling your own products and affiliate marketing.
I write review posts like:
- Product Launch Formula Review
- Book Arbitrage Profit System Review
- Experience Product Masterclass Review
These posts might not get a lot of search volume but each sale they generate pays me a commission over $1,000. That’s why I love affiliate marketing.
If you want to create your own products, I still recommend affiliate marketing first. Before you make your own course, sell other courses to see what your audience wants. Whichever course sells the best, that’s the one you want to pursue.
To determine if a niche is viable, open a spreadsheet. You need at least thirty viable offers in a niche that you can promote and can make enough money to move the need. If you’re commission is $1 for every sale, you need a lot of traffic to quit your job.
Here’s a link to a blank spreadsheet you can use to find out of your idea for a niche is actually a good one.
If you can’t find thirty offers that you can promote and make decent money, then it’s not a viable niche. This is a very logic driven approach and it means you won’t accidentally spend six months building a business that cant’ pay for itself.

This is a spreadsheet my friend Dom made when trying to determine if DIY is a good niche for him to get into. He discovered that Facebook ads were super cheap in this niche and was excited to have a gold mine.
When I heard this I started to get really worried that there might be a reason the ads in that niche are so cheap.
He discovered that there weren’t thirty offers, the payouts were low, and that most of them were instructions to build a shed. Nobody is going to be more than one training on how to build a shed, so those are really just duplicates.
This is an example of a niche where there isn’t much profit.
High Volume Low Commission
You might be saying to yourself that I’m missing out on all the big commissions selling tools to fill that shed. If you want to sell physical products, like hammers and Amazon products, be ready for commissions measured in pennies.
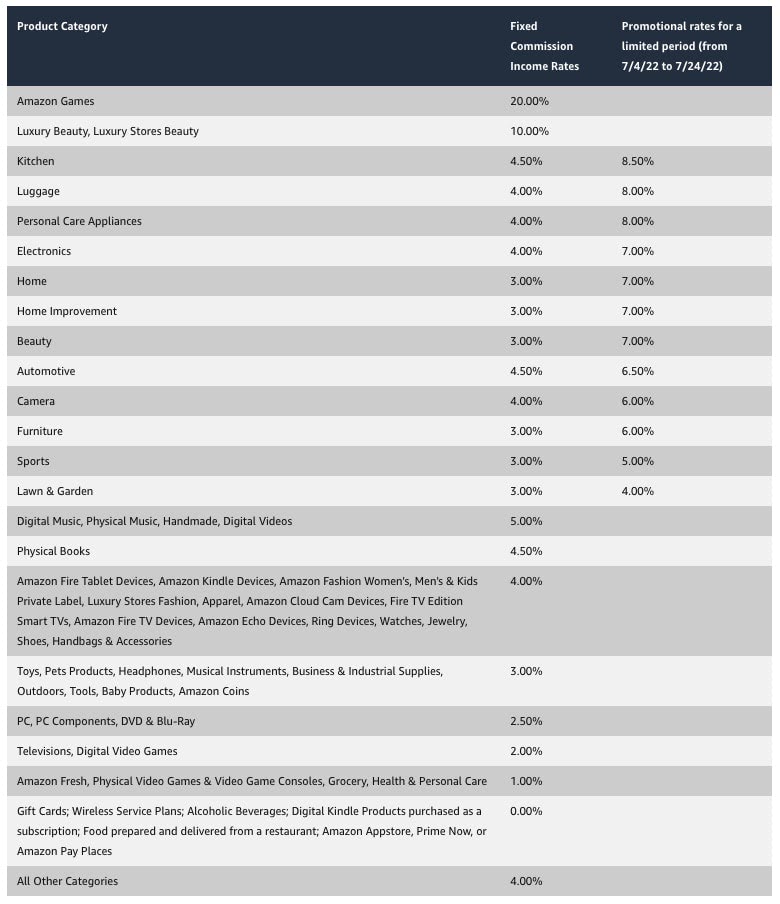
For most categories, the commission is 3-5%. Home improvement pays a 3.% commission of every sale you generate. Let’s look at the numbers.

This is the Amazon Choice recommendation for a hammer right now. It’s also the #1 product in the claw hammer category. This is a popular hammer with over 4,400 reviews and a 5-star rating. If I post my affiliate link for this hammer right HERE, you might buy it.
If you place your order within 24 hours of clicking my link, I will earn a whopping 29 cents. I have to sell over 3,000 hammers to make $1,000. That’s a lot of hammers and a lot of clicks from my website.
That means I need massive traffic to even get paid by Amazon. They don’t pay anything until you’ve earned over $100.
The top tool on Amazon is this Blink Video Doorbell selling for $80.97. It’s a most expensive product, although I’m not sure many would consider it a tool.
Amazon might give the higher electronics payout of 4% instead of the measely home improvement payout of 3%.
You’ll get paid $3.23 for every one of these you sell. Much better than a hammer, but not enough to tip your PostMates driver, let alone pay for the food.
This is why testing a niche idea against the cold hard truth of a spreadsheet is so important.
Finalizing Your Niche
You might have to go back to the drawing board a few times, but once you find a niche that can actually drive revenue, you have yourself a business.
When choosing your niche look for the one that gives you the highest scored on these three axes:
- Passion – You care a lot about the topic and you find it interesting to write about
- People – A lot of people are interested in the topic
- Profits – There is a lot of opportunity to make money
In each category, give your niche a score from 1-10. Whichever niche gets you closest to 30 is going to be the best option for you.
If you want to go deeper into this process, please read my book Serve No Master where I go into a lot of detail with even more explanations.
Step 2 – Find your Customer Avatar
The second step in our process is to find your ideal reader. Every single blog post is a letter to someone. Who is the one person you most want to read your handwritten letter?
Your avatar can be based on a real person or an amalgamation of characteristics that you’ve assembled into a single imaginary character. This avatar will represent your entire audience and they are the bullseye of your target demographic.
This is the Avatar worksheet. Download this PDF, print it out and fill it in by hand. The more you understand who you are writing to, the easier it is to write amazing content and make your blog successful.
There is a box where you can draw a picture of your ideal reader and places to put in their demographics and psychographics.
If we know their dreams and their disappointments in life then we know what they want to read about. How to inspire them and give them hope for the future.
Step 3 – Choose a Blogging Platform
There are quite a few options for where you’re blog will live online.
- WordPress
- Blogger
- Tumlbr
- Wix
- Ghost
- Medium
- Squarespace
- Weebly
These are the most popular blogging platforms with WordPress leading the rest of the pack by a country mile. More blogs are built on WordPress than all the other platforms combined.
The first question is if you want to own your blog
If you host your blog on another site, then you don’t own it. If this blog was at ServeNoMaster.WordPress.com then it wouldn’t be my website at all. It would belong to WordPress and there would be extreme limitations on my ability to grow and monetize my content.
Want to get more blog subscribers and build your fan base? Download my free guide "Get Your First 100 Fans" Click here to get the guide.
WordPress

WordPress is our recommendation for where to build your blog.
WordPress is the best blogging platform for a number of reasons. First, it is extremely user-friendly, even for beginners. Setting up a WordPress site is a simple process that can be completed in minutes. Second, WordPress offers a wide range of features and plugins to choose from, making it easy to customize your site to suit your needs. Third, WordPress is highly secure, so you can rest assured that your site and content are safe from hackers. Finally, WordPress is free to use, meaning you can start blogging without spending any money. For all these reasons, WordPress is the best choice for anyone looking to start a blog.
WordPress is the world’s most popular blogging platform, and for good reason. WordPress is easy to use, packed with features, and completely free. WordPress also offers a wide range of plugins and themes to choose from, allowing you to customize your blog to suit your needs. WordPress is also a highly-secure platform, with regular updates that keep your site safe from hackers. And if you ever need help, there’s a large WordPress community that’s always happy to lend a hand. So if you’re looking for the best blogging platform, WordPress is the clear choice.
Blogger

Blogger is a good blogging platform for a number of reasons. First, it is easy to use and setup, which makes it ideal for users who are not familiar with web design or coding. Second, Blogger offers a wide range of features and customization options, allowing users to create unique and personal blog sites. Third, Blogger is integrated with Google Services, including Gmail and Google Drive, which makes it easy to share content and collaborate with others. Finally, Blogger is free to use, which makes it an affordable option for users who are on a budget. Overall, Blogger is a versatile and user-friendly platform that can be used to create a variety of different types of blog sites.
Tumlbr

Tumblr is a popular blogging platform that offers users a unique and convenient way to share content. One of the key advantages of Tumblr is its ease of use. Tumblr provides users with everything they need to create a blog, and it is easy to find helpful tutorials if you need assistance. Tumblr also offers a wide range of customization options, so you can make your blog look however you want. In addition, Tumblr has built-in social media integration, which makes it easy to share your content with a wider audience. Tumblr also has a strong community feel, and you can connect with other Tumblr users who share your interests. All of these factors make Tumblr an ideal platform for bloggers who want to share their content with the world.
Wix

Wix is a popular blogging platform that offers users a wide range of features and tools. One of the benefits of Wix is that it is easy to use, even for beginners. The platform provides a simple drag-and-drop interface that makes creating content quick and easy. In addition, Wix offers a vast selection of templates and designs, giving users the ability to create a unique and professional-looking blog. Another advantage of Wix is that it is fully customizable, meaning that users can add their own features and functionality as needed. This makes Wix an ideal platform for businesses or individuals who need a high degree of control over their blog. Finally, Wix is free to use, making it an affordable option for those on a budget. For all these reasons, Wix is a good choice for anyone looking to start a new blog.
Ghost

Ghost is a good blogging platform for a number of reasons. For one, it is open source, which means that it is constantly being improved by a community of developers. Additionally, Ghost is very user-friendly, making it a good choice for beginners. Another selling point is Ghost’s focus on content. Ghost does not include any distractions like sidebars or social media widgets, which allows readers to focus on the writing. Finally, Ghost offers a great deal of flexibility when it comes to customization. Users can change the theme, colors, and fonts to create a unique look for their blog. Overall, Ghost is an excellent blogging platform that offers a clean design, ease of use, and a high degree of customization.
Medium
Medium is a popular blogging platform for a number of reasons. First, it is very user-friendly and easy to set up. Medium also offers a variety of features that can be useful for bloggers, such as the ability to follow other users and create collections of articles. In addition, Medium has a built-in audience of millions of readers, which can help to increase the visibility of your blog. Medium is also free to use, which makes it an affordable option for many bloggers. Overall, Medium is an excellent choice for those looking for a reliable and user-friendly blogging platform.
Squarespace
Squarespace is a popular blogging platform for a reason. It’s simple to use, has a wide range of features and is extremely versatile. Whether you’re a beginner or an experienced blogger, Squarespace has everything you need to create a beautiful blog. One of the best things about Squarespace is that it’s incredibly user-friendly. Even if you’ve never used a blogging platform before, you’ll be able to figure out Squarespace with ease. Another great thing about Squarespace is that it offers a wide range of features. From premium templates to built-in social media integration, Squarespace has everything you need to create a professional-looking blog. Finally, Squarespace is extremely versatile. Whether you want to use it for personal blogging or for business purposes, Squarespace can be customized to suit your needs. If you’re looking for a top-notch blogging platform, Squarespace is one of the best options out there.
Weebly
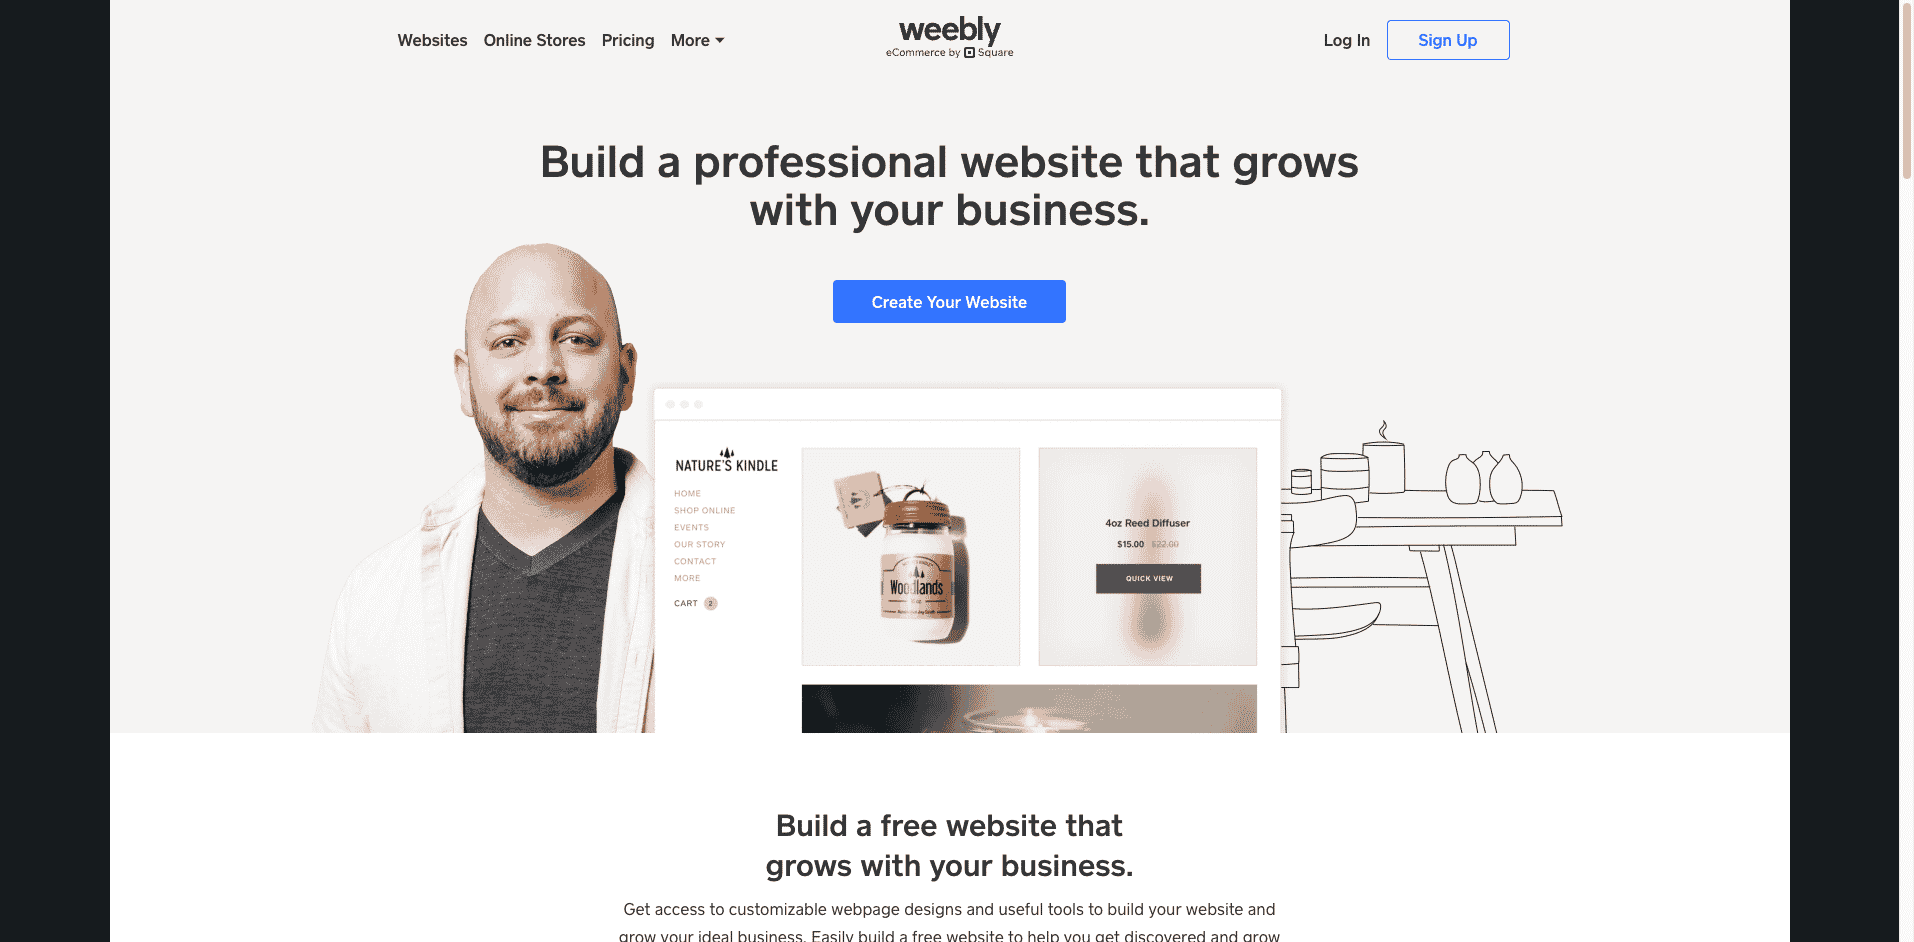
Weebly is a popular blogging platform that offers a wide range of features and customization options. Weebly blogs are easy to set up and use, and they offer a variety of templates and themes to choose from. Weebly also provides users with tools to help them grow their blog, such as a search engine optimization tool and an analytics interface. In addition, Weebly blogs can be integrated with social media platforms such as Facebook and Twitter. As a result, Weebly is a good platform for bloggers who want to start or grow their blog.
No matter which blogging platform you choose, you need to give it a name.
STEP 4–Buy a Domain for your WordPress Blog

This means you own the name of your website. For example, I own “servenomaster.com”. I have owned many websites. Some of them I have kept for a decade and some I used for a year or less and dropped when they were no longer profitable.
You want to pick a domain name that you like and that defines who you are and what you want to write about.
I have blogged on quite a few domains and used quite a few services before I got where I am today. My very first site was called SmellMyBlog.com. It was great for a fun little blog that I only thought a few people were reading, but when traffic exploded, I realized that I needed to change the domain name to something more serious.
Nobody wants SmellMyBlog to appear on a credit card bill at the end of the month.
Many bloggers just use their names. Unfortunately, JonathanGreen.com was already taking by a grass seed and lawn care company.
I chose my domain using this exact process:
Go to Namecheap
This is my favorite vendor for domain name registrations. You should NEVER buy your domain and website hosting from the same company. This leaves you extremely vulnerable if something should go wrong.
If your hosting account gets hacked and you don’t get it, youre host might delete your account. SiteGround did that to me once. If I had my domains registered with them, I would have lost the websites as well.
It’s an extra ten minutes of work, but it’s absolutely worth it to protect your business.
Search for Blog Ideas and Dot Coms
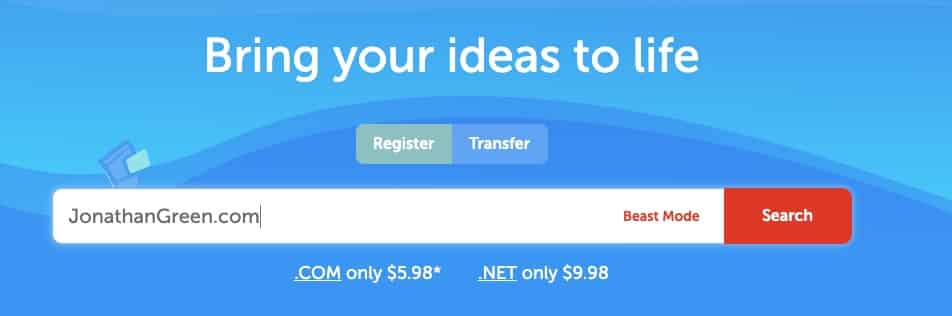
There are other endings, but the only one that matters is the .com. 99% of websites have this ending and it gets more authority than anything else.
It’s better to keep searching than to take a different ending.

Namecheap suggests that I misspell my name and pay almost two grand for the pleasure. That’s not going to work so I keep searching until I find a name that matches my brand.
Ideally we want to find a two-three word phrases that fits our niche.

I found an available domain that matches me since I’m an affiliate marketer living on a tropical island but that $888 premium up front is a real kick in the teeth. I know we can do better.
This process can take a few hours, but it’s absolutely worth it.

When I was searching for a name for this blog, I originally wanted BloggerWithoutBorders.com but it was taken at the time. Now it’s available.
You never know what you’ll find but this search is worth it to get that perfect domain name and only pay $9 for it.
Spend some time coming up with a cool domain name and grab that domain as soon as you think of it. If you do a search and decide to think about it for a day, the domain might be gone tomorrow. There are many companies that scan the searches and grab any cool names that other people think of.
Don’t let this happen to you.
Grab your domain right now.
Once you have paid your $9 you are ready to move on to the next step.
STEP 5 – Get Web Hosting
Now that you have your domain name, you need to find a real home for your blog website.
Hosting means there is a computer inside a big warehouse somewhere that is always on.
Your new blog will live on this computer (called a server).
When recommending your host the only factor I care about is speed. I want your website to load fast so that your visitors have a good experience and Google sends you a lot of traffic.
Page load times are now a core metric and slow websites don’t get traffic
When it comes to your new blog, there are three levels of hosting to choose from.
Affordable Hosting

Bluehost starts at less than $3 a month and I’ve had accounts with them for years. W
BlueHost is one of the most popular shared hosting providers on the market. They offer a wide range of features and plans to meet the needs of any website owner, and their prices are very competitive. BlueHost offers a basic shared hosting plan for as little as $3.95 per month, which includes support for up to 100GB of storage and unlimited bandwidth. For larger websites, BlueHost also offers VPS and Dedicated Server plans. BlueHost is an excellent choice for website owners who are looking for affordable, reliable shared hosting.
Bluehost is an affordable shared hosting option for your website. Bluehost’s plans start at $2.95/month, which is a great price for shared hosting. BlueHost also offers a wide range of features, including unlimited storage, bandwidth, email accounts, and FTP accounts. Bluehost’s customer support is available 24/7, and they offer a money-back guarantee if you’re not satisfied with their service. Overall, Bluehost is a great choice for shared hosting, and their prices are very competitive.
FAst Hosting

A2 is the fastest shared hosting for your website. A2’s Shared Hosting plans give you the tools you need to take your website to the next level without breaking the bank. A2’s Turbo Servers provide a 20x faster page load times than competing hosts, making A2 the perfect choice for businesses and individuals seeking a reliable and affordable web hosting solution. A2 also offers a 99.9% uptime guarantee, ensuring that your website will be up and running when your customers need it most. With A2’s Shared Hosting plans, you’ll have everything you need to take your website to the next level without breaking the bank.
A2 is the fastest shared hosting for your website. A2 Optimized is a technology that makes A2’s servers up to 20x faster. A2 also offers free SSL Certificates with all of their hosting plans. A2’s approach to security is simple: they work with the best technologies available. A2’s team of experts are constantly testing and improving their security measures. As a result, A2 is one of the most secure hosts available. A2’s uptime is also impeccable. They offer a 99.9% uptime guarantee, and they regularly exceed that guarantee. A2’s customer support is outstanding. Their team of experts are available 24/7/365 to help you with any issue you may have. A2’s pricing is also very competitive. They offer a variety of plans to fit any budget. A2 is the perfect host for your website. They offer the speed, security, and uptime that you need, at a price that you can afford.
The best plan is the $6.99 Turbo Boost Hosting.
Premium Hosting

Kinsta is a premium hosting company that promises its customers the fastest loading speeds for their websites. Kinsta’s primary focus is on WordPress sites, and it offers a number of features that are designed to improve performance, including a custom caching plugin and a content delivery network. Kinsta also has a team of experts who manage WordPress sites for their clients, and they are available 24/7 to help with any issues that may arise. Kinsta’s plans start at $30 per month, and its highest-priced plan is $1,500 per month. Kinsta’s customers include small businesses, enterprise companies, and bloggers.
Kinsta has consistently been one of the fastest premium hosting providers for WordPress websites. Kinsta’s average response time is under 200ms, which is incredibly fast. Kinsta also offers various speed optimization features, such as HTTP/2, free CDN, and more. Kinsta’s servers are also located in multiple data centers around the world, so you can choose the one that’s closest to your target audience. Kinsta also offers 24/7 support from their team of WordPress experts. If you’re looking for a fast, reliable, and supportive premium hosting provider, Kinsta is an excellent choice.
STEP 6 – Connect blog domain with hosting
Basically, with this step, you are telling the Internet how and where to reach your blog content.
Entering the domain name (address) in the browser leads your users to your blog. You just have to tell DNS (Domain Name System) how to translate alphabetic letters in the address to an IP address it can use.
In this step, we are going to tell Namecheap the name of the computer that we are hosting our website on. Each host will give you the numbers in a slightly different way, but this process should take less than five minutes.
Bluehost DNS Walkthrough
I’m going to use BlueHost, for example, to explain to you how to do this because BlueHost has one of the easiest processes I’ve experienced so far.
First, get your Name Servers from BlueHost.
You can find your DNS Settings inside your Bluehost Dashboard by clicking on Domains and then Name Servers in the bottom right corner.
Now, log in to your NameCheap account.
Click on where it says Domain List

Choose the domain you want to put your blog on
Click on “Manage Domain” next to the name of that domain

- Click where it says nameservers.
Make sure it says “Custom DNS”
Then input these 2 answers (they are the most DNS for shared hosting with BlueHost)
ns1.bluehost.com
ns2.bluehost.com

Save your changes by clicking the green check mark and then you’re done!
STEP 7 – Install WordPress
All three of our recommended hosts offer 1-click installation of WordPress, so this step is super easy. In each case, you log into your host with the username and password they emailed to you and click “Install WordPress.”
Let’s install WordPress in our Bluehost dashboard.

On the lefthand side of the screen click on “My Sites.”
On that page click on the blue button that says “Create Site” in the top right corner.
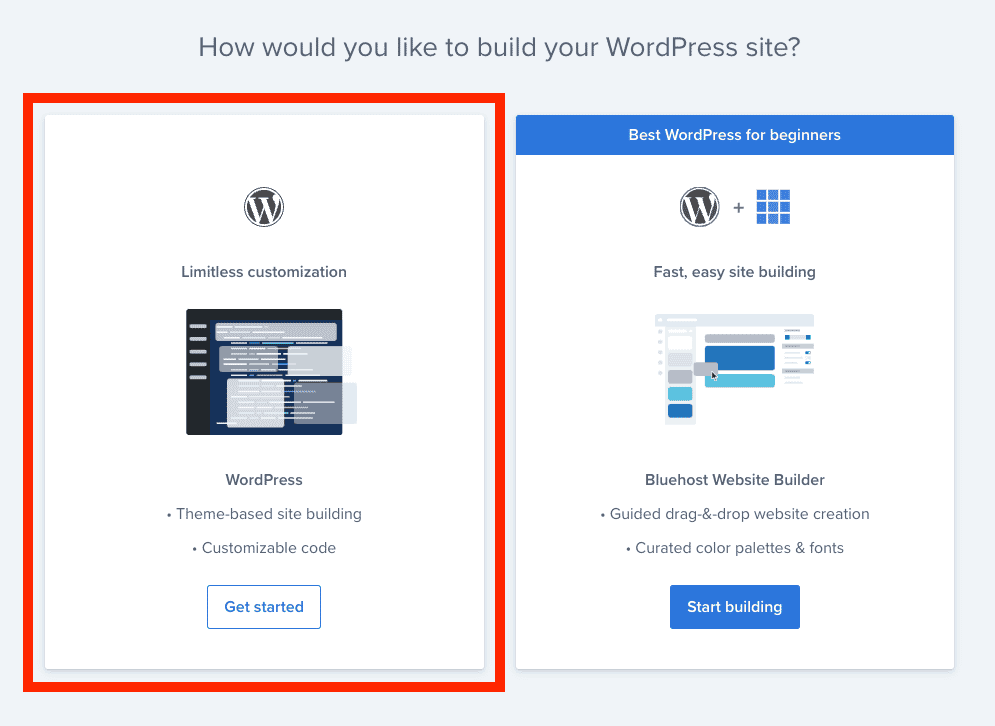
On the next screen click the lefthand choice. We always want to start with a clean installation of WordPRess without any additional unnecessary stuff from your host.
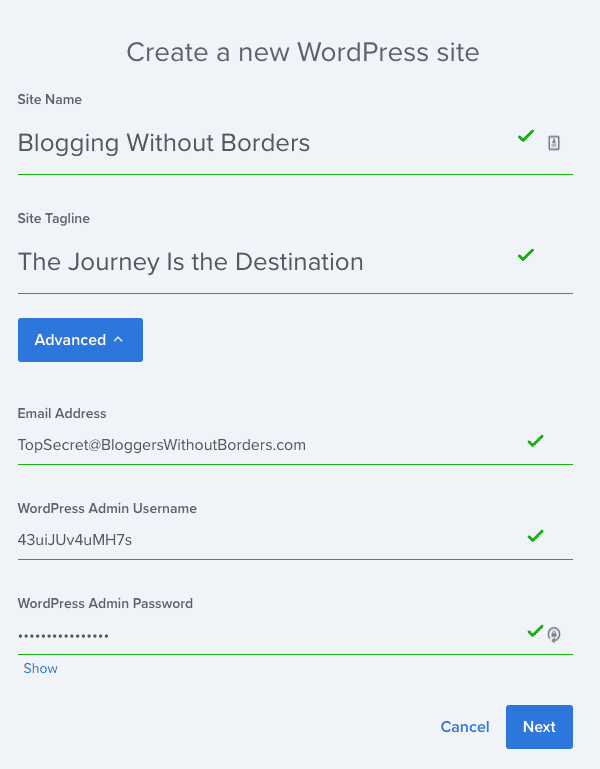
On the third and final screen you will name your blog, and give it a tagline. These can easily be changed later, so don’t stress too much.
Make sure to click on Advanced.
For security reasons, which I cover extensively in my host How to Secure Your Blog, you want to choose your username and password.
Your username should be a randomly generated set of characters just like your password. Visitors to your site will never see this username, it’s only for the backend and it makes your website nearly impossible to hack.
If you have any problems with installing WordPress on your site, refer the hosts support documents.
Every single host shows how to install WordPress on their servers.
Step 7 – Select a Theme and Make Your Blog Your Own
Now it’s time to make your blog look just the way you want it. This is a chance to go down a real rabbithole where you can spend hours looking at dozens of beautiful things.
When choosing your theme, there are a couple of things to keep in mind.
- Never use a free theme – they are notorious for having malicious or dirty code that puts your site at risk. Just stick to the default them if you have no budget.
- Speed matters most – A fast, ugly website can get a lot of traffic and make a lot of money. A slow beautiful website won’t get any visitors.
- Frequent Updates – Themes should get updated monthly as the main WordPress code is constantly changing. These updates are frequently closing new security loopholes.
Here are the themes that you can choose from starting with my personal main recommendation.
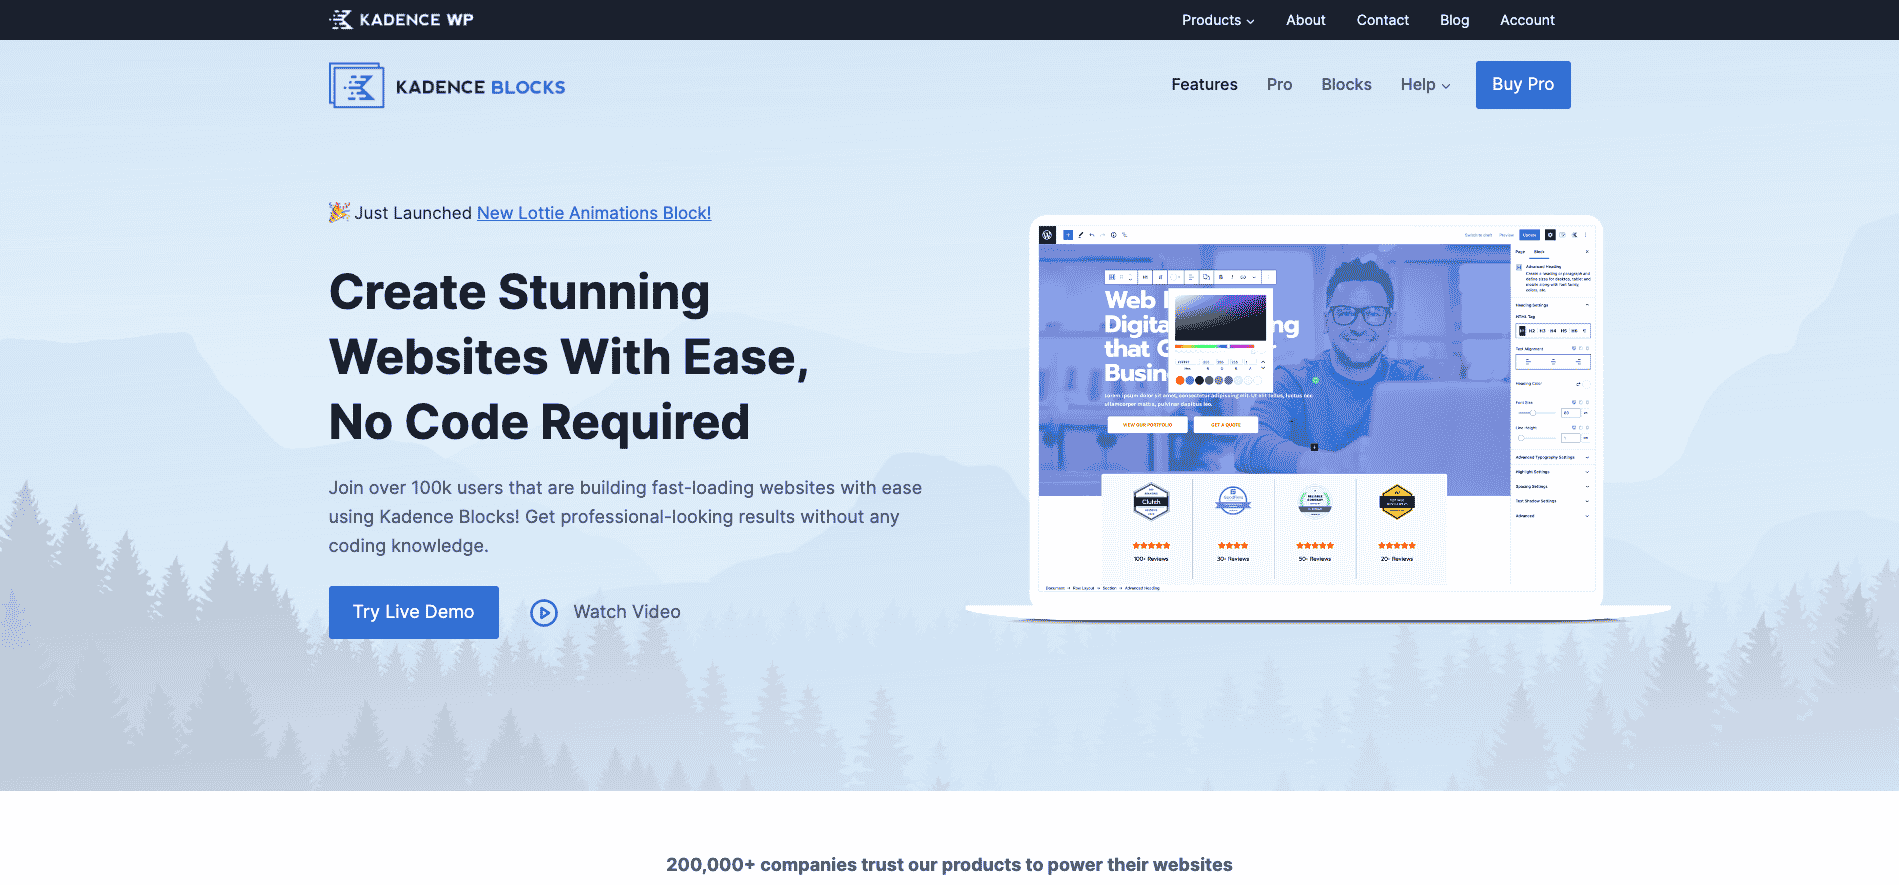
Kadence WP

Kadence is the best WordPress theme for new sites. It’s the fastest theme that non-coders can use to build a beautiful site very quickly. Unlike a lot of other themes, the main focus on Kadence is streamlining.
Most of those massive lists of features other themes have really aren’t worth it. They lie dormant on your website taking up server space and slowing down the customer experience.
Kadence is the theme I switched to when speeding up this website and it made a big difference. It’s build on the modern version of WordPress and doesn’t have leftover code like some of the more well-known themes that have been around for years.
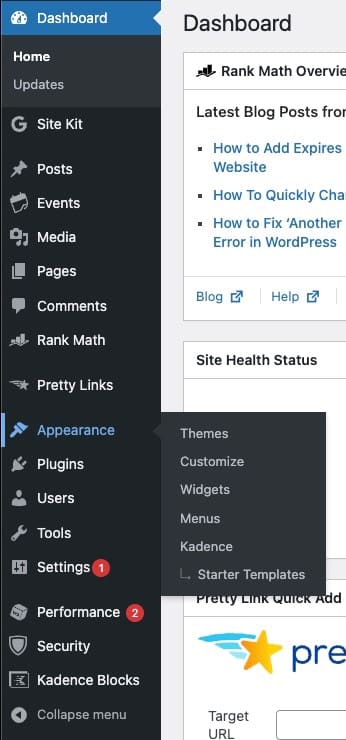
To add a new free theme from the WordPress directory, click on Appearance and then Thems on the lefthand sidebar.

Above your currently installed themes, is a blue button that says “Add New.”
Click that button.
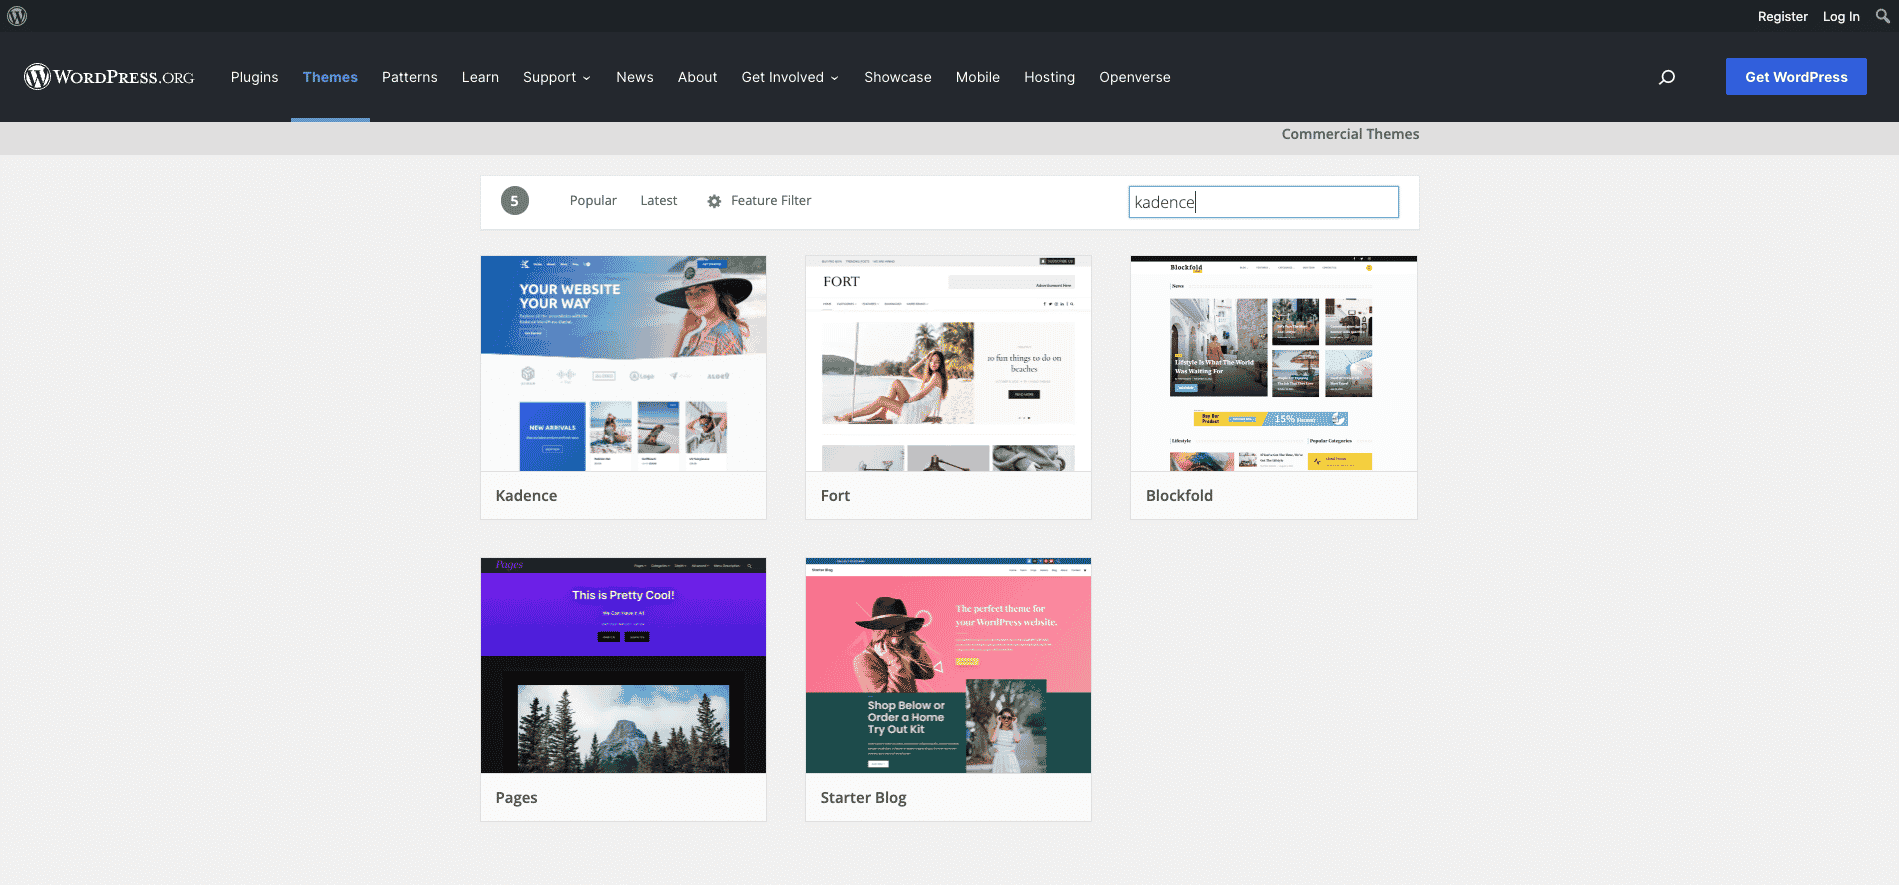
Type “Kadence” into the search bar to find the free version of the Kadence Theme.

You can see more details about the Kadence theme in the WordPress repository. When choosing a theme, it’s very important that it come directly from the WordPress repository.
There are a lot of “free” themes that have problems in the code that you don’t want on your website. So it’s important to only use a trusted theme.
Kadence comes with a few starter templates that you can use to build your site from the ground up.

When looking at the Kadence options, click on “Starter Templates” to see the options for a prebuilt website.

There are both free and pro Starter templates. I have a pro account with Kadence, so I see both sets of options.

The option that most interested me is this black theme for a music festival called UR BAnd. This is a free template that most aligns with what I want the site I’m working on to look like. I’m not building a music site, but I like the simple way this is structured.
My site will give away free books and I want to keep it simple.
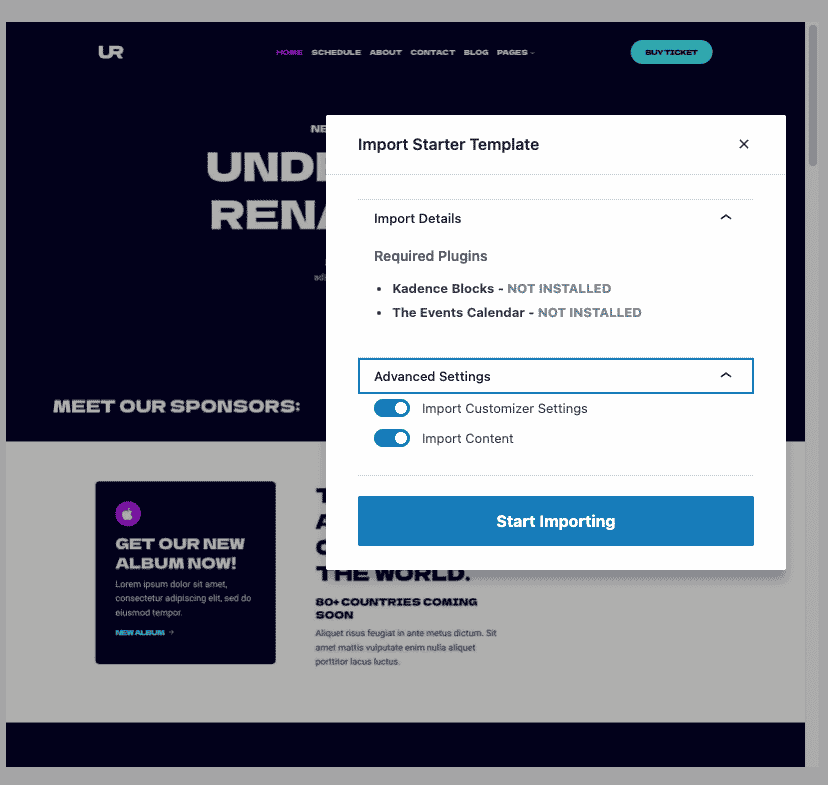
When you click on the theme, it will show you any plugins that you need that aren’t already installed. I need Kadence Blocks and The Events Calendar for this Starter Template to function properly.
You can either install each plugin manually from the WordPress plugins tab (they are both free) or just hist the Start Importing button and they will get installed automatically.
Leave both boxes checked to import the customizer settings and content. This will give you pages filled with text that you then will need to replace the text as you build out the website.

This is where Kadence really starts to shine. You can choose the fonts and color schemes that are predefined (that means the colors will work together and look nice.)
Once you’ve finished customizing your starter templates, you are off to the races.

I use Kadence Pro becuase it has a ton of powerful additioanl plugins and features that come as part of the package. I’ll cover Kadence Blocks Pro a little further down. When you upgrade to the pro version, enter your email address and license key here to unlock all the advanced features.

When you activate the pro version, you will get access to all of these Kadence Pro Premium Features:
- Header Addons
- Hooked Elements
- Ultimate Menu
- Fixed Elements
- Header and Footer Scripts
- WooCommerce Addon
WP Astra

Our second choice for a great theme is WP Astra, this is the last theme I was running. It’s got a few more features and a lot more starter templates to get you off the ground with a beautiful blog.

Asta comes with a whopping 230 starter templates, which is a lot more than Kadence becauase it’s been around longer. Astra is one of hte most popuplar themes because it’s fast and has so many features.
It has templates that work with multiple pagebuilders. Unfortunately, that is no longer a feature. With the advent of Gutenberg, we don’t need pagebuilders anymore. Removing Elementor from this website, spep up. the load times of every page by a full 2 seconds.
That’s a lifetime!

Astra does have quite a few Gutenberg templates. to choose from including these three.
Astra is a powerhorse full of features and every single customization that you would ever imagine.
This theme has a lot more features because it’s been around a little longer. Those features come at a price, however. WP Astra is slightly slower Kadence.
If you want to balance a little more toward features and beginner-friendliness, then WP Astra is a great option for your new blog. This is completely a personal decision as this is an excellent theme and I still have a lietime unlimited license.
The Gutenberg Editor
WordPress switched from the Classic to the Gutenberg Editor and the window where you could still use “classic” has already closed.
Gutenberg is a reaction to a lot of third party tools called page builders. These addons would make your website drag and drop. I used one to build this site.
Unfortunately, page builders were slowing down websites.
With Gutenberg, the ability to design really beautiful pages is built into the core code of the website and you don’t need a pagebuilder anymore.
Gutenberg Blocks Addon Plugins
Instead we now have plugins that give us additional Gutenberg blocks with cool new features. There are a lot to choose from and it can be a littler overwhelming. Especially because they don’t conflict with each other.
You CAN install all of them on your website and they won’t fight, they’ll just slow it down.
You can install up to two of these plugins before your’ll notice any slwoing effect, but you really only need one.
Kadence Blocks

Kadence blocks are free and the best way to get started with these beautiful blocks. They add a lot of functionality, don’t slow down your site, and have everything you really need to grow your blog. The following blocks are absolutely free:
- Row Layout – Create rows with nested blocks either in columns or as a container. Give style to your rows with a background, overlay, padding, etc.
- Advanced Gallery – Create stunning photo galleries, carousels, and sliders! Enable custom links, captions, and more. Plus you can select the image size for performance.
- Form – Our powerful form block allows you to easily create a contact or marketing form and style it within the block editor.
- Advanced Text – Create a heading or paragraph and define sizes for desktop, tablet and mobile along with font family, colors, etc.
- Advanced Button – Create an advanced button or a row of buttons. Style each one, including hover controls. Plus you can use an icon and display them side-by-side.
- Tabs – Create custom vertical or horizontal tabs with advanced styling controls. Each tab content is an empty canvas able to contain any other blocks.
- Accordion – Create beautiful accordions! Each pane is able to contain any other block, customize title styles, content background, and borders.
- Testimonials – Create confidence in your brand or product by showing off beautiful and unique testimonials. Display add as a carousel or a grid.
- Icon – Choose from over 1500+ SVG icons to add into your page and style the size, colors, background, border, etc. You can also add multiple icons side-by-side.
- Spacer / Divider – Easily create a divider and determine the space around it or just create some space in your content. You can even define the height per screen size.
- Info Box – Create a box containing an icon or image and, optionally, a title, description, and learn more text. Style static and hover separately.
- Icon List – Add beautiful icons to your lists and make them more engaging and attract viewers’ attention. Over 1500 icons to choose from and unlimited styles.
- Countdown – Increase your conversions by adding a sense of urgency to your offering. Pro includes evergreen campaigns as well.
- Posts – Display a clean grid of posts anywhere on your site, great for your homepage where you want to tease your blog.
- Table of Contents – Allow your readers to navigate your content easily with a table of contents block. Includes smooth scroll to anchor.
- Lottie Animation – You can import lottie animations into your site. You can choose how the animation plays and control animation speeds, loops, etc.
The free version can be downloaded directly from the WordPress plugin repository and it’s really amazing. I started using these blocks during the process of speeding up my sites loading times and I was very impressed.
The pro version of Kadence blocks is how I built my homepage and all of the popups on this website. They are constantly releasing new blocks that are astounding. When you upgrade to Kadence Blocks Pro you get :
- Image Overlay – create an image link with an overlay title and subtitle
- Video Popup – display a thumbnail with overlay and hover effects
- Modal – create a button that generates a popup modal of any kind
- Post Grid – create a grid of posts to match the style of your website
- Split Content – play a video on one side with text on the other
- Advanced Slider – replaces the need for a separate slider plugin
- Pro Addons – additional galleries, countdowns, and forms
- Custom Features – animated on scroll, custom icons, dynamic content, custom fonts, pro design library and page-specific CSS
By the time I write about their new Animation Block, they will have released another new block that’s even cooler.

Kadence blocks Pro includes the Kadence Pro theme in the Essential Bundle and up. It’s a great deal as these are the foundational building blocks of a fast and beautiful site built on the Gutenberg protocol.
It’s how I’ve build this site.
If you’re going to go with a paid theme, them Kadence is the best option by a country mile.
Step 8 – Secure Your Blog
I know we haven’t even started your first blog post yet and I’m talking about security.
There’s nothing worse than working on night on that big term paper and then the power to the dorm goes out and the paper is lost forever.
We need to setup a save system to protect your website. I have a much longer article on How to Secure Your Blog, but let’s start with the basics.
Backup Your Website
How frequently are you going to update your website with new content? If you’re writing one post a day, then a daily backup is enough to get started.
If you’re posting fifty times a day, well that’s a lot to lose if things go bad.
Kinsta automatically backs up your blog every day without using server resources. With our more affordable hosts, however, you’re in charge of setting up the backup settings.
Backing up your website does take server resources and can slow things down to a crawl, so it’s best do do a late night backup when everyone is asleep and not reading your new blog posts.
BackupBuddy

Backup Buddy is a great WordPress plugin that helps you to backup your website. It is a user-friendly plugin that is easy to setup and use. Backup Buddy also offers a wide range of features that are designed to help you backup your website quickly and easily. One of the best features of Backup Buddy is its ability to create backups of your entire website, including your database and files. This means that if you ever need to restore your website, you will have a complete backup to work from. Backup Buddy also offer scheduled backups, so you can ensure that your website is always backed up. Overall, Backup Buddy is a great WordPress plugin that helps you to backup your website quickly and easily.
Install Backup Buddy, create an entire backup of your website and then test installing that backup to make sure the backups are actually working.
There is no worse time to find out you have an incorrect setting than after an emergency.
Set Backup Buddy to create a backup once a day at 2AM, or whenever your readers are asleep and store the backup offsite.
Do not store the backups on your hosting server as they will start to take up a lot of space and if your website is hacked, the backups will get corrupted with the rest of the site.
Set your backups to sync with the cloud storage provider you use. BackupBuddy works with Amazon S3, Google Drive, Dropbox and a few other options.
Once BackupBuddy is setup, you’ll see a new backup appear in your Dropbox folder every morning when you wait up on autopilot. You never have to worry about being unable to recover your website again.
This backup will protect you from all forms of malware, hackers and even problems with your hosting company.
Because you setup your domain with Namecheap, you can switch to a new host, run BackupBuddy’s restore procedure and have your site back within a matter of minutes. You’re protected from the unexpected.
Activate SSL
When you activate SSL, you get the little lock next to your website in the address bar.
The internet has switched from HTTP to HTTPS because it’s more secure. In the past setting all of this up was really expensive and complicated.
Fortunately, all the hosts I’ve recommended make it painless to setup SSL in a matter of minutes.

In Bluehost, pick your site and click the blue button that says “Manage site.”

Under security, you’re going to flip on both of these switches. The first activates SSL and the second forces your website to ONLY use SSL.
This might log you out of WordPress when you reload the page, so make sure you have your username and password saved.
Protect Your Website
While having a backup of your website is great if the worst happens its even better to prevent it from happening and that’s where having the right security plugin comes into play.
There is a misconception that if your site is small, hackers won’t bother attacking you. Unfortunately, the opposite is true. They like to subvert smaller sites to gain more computing power to hack larger sites.
I’ve written an extensive training on Website Security, but all you need to know is that iThemes security is the fastest and most secure option. The free version is more than enough to secure your website without slowing it down.
There are quite a few options in this space, but after extensive testing we’ve found that iThemes provides the best solution currently.
iThemes Security

iThemes Security is the same company behind Kadence and moving to their product suite has been very good for my website.

Click on plugins on your left sidebar.

At the top of your screen, click on the button that says “Add New.”

Search for iThemes Security and look for the yellow shield. That’s the plugin that you want with over one million active installations. Click on the button that says “Install Now.”
Then click it again when the button says “Acivate”
When the button says “Active,” the plugin is active and ready to customize.

You can go through the setup wizard, which I recommend, or set up your security manually.
The first area we want to focus is Login Security. I like to turn on all three options under Lockouts.
The most common type of attack on blogs is Brute Force so we want maximum security.

Site check looks to see if a file is changed. This is an early warning sign that your site has been hacked by someone messing with the actual files and possibly planting a virus. You definitely want File Change activated so that your site will tell you if something weird is happening.
The second option is to run a scan twice a day.
This is up to personal preference as these scans use up server resources and can slow down your site. I lean toward a faster site, so I leave this option turned off.

Our Utilities options have two important settings. Enforcing SSL means no visitors will accidentally hit an http page or link on your site.
Earlier, we chose to enforce SSL in the Bluehost security settings. If your host doesn’t offer the enforce option in the server settings, flip the switch here and iThemes will redirect all http pages to https.

The most important feature in all of the security setup is limiting login attempts. If you don’t have a limit, WordPress will allow a hacker to guess millions of passwords until they get it right and never even tell you it’s happening.
How many times can someone mistype their password before you lock them out of the system? I think five and ten tries are more than reasonable and we only need to lock them out for a few minutes. This is enough to stop a brute force attack from a bad computer but not so long. that a real user will get upset.
You can adjust these numbers based on your own security preferences.

If you want to take your security to the next level, turn on two-factor authentication. This is where you have an app on your phone that generates. a new six-digit code every thirty seconds.
You need to enter your username, password and current code to login to your site.
This is a very high level of security that most banks are switching to and it’s the ultimate in security. Unfortunately, if you lose your phone you can get locked out of your website.
There are ways to prevent that from happening with a backup password, but this is the ultimate in securing your site.
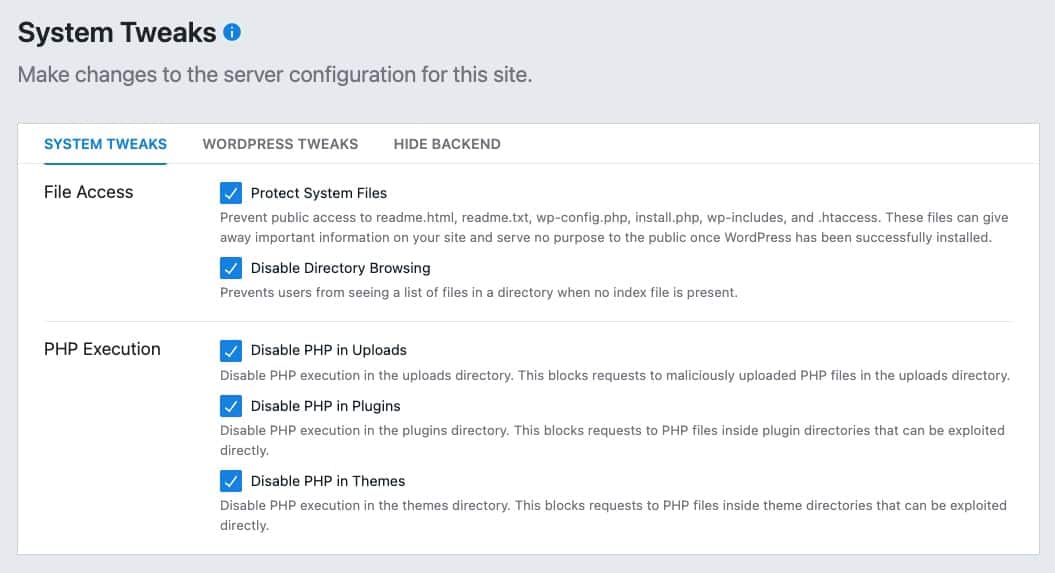
The System Tweaks prevent visitors from uploading viruses to your website, so leave all of these turned on.

I never edit files inside of WordPress as it’s a big vulnerabilty if someone else gets access to this ability. Better to leave it turned off and edit any files on your local computer.
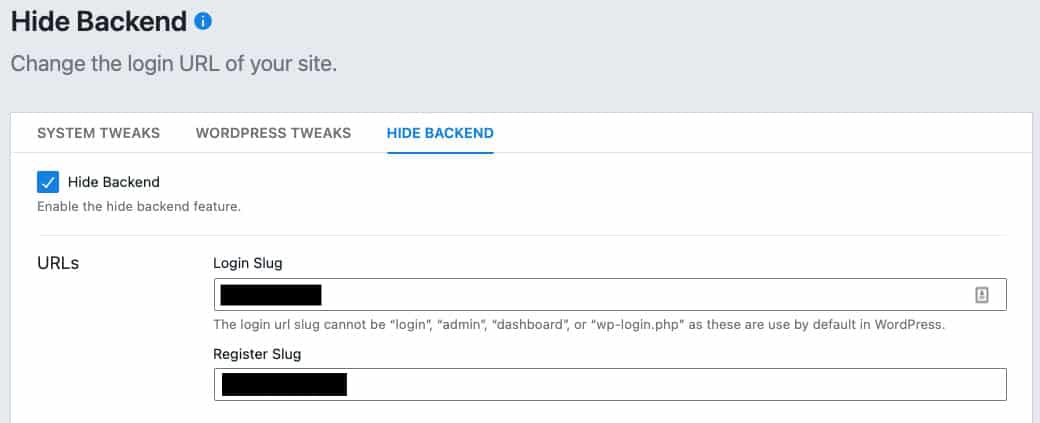
This is another serious security feature that will block bad actors from even trying to hack into your site. This hides the login page url.
Make sure you remember the new page that you make your login page. If nobody knows where the lock on your website is hidden, nobody can try to pick that lock.
With these settings in place your blog is much more secure and it will still run fast.
Step 9 – Optimize for Search Engines and Visitors
The next step is to prep our blog to give visitors a good experience. We are going to install a few more plugins that will do all the hard work for us. Set them up once and all the hard word is done in the background for your.
First we are going to optimize the backend of our website, How posts are connected to each other making it easy for a visitor, be it a search engine spider or a human, to find all your content.
Search Engine Optimization
Search engines are not smart. They only know how to react do the data they expect. So we need a plugin to translate your content into their language.
The majority of search traffic comes from Google, so we want to make it easy for visitors to come from Google to your website. For that we need to install the Site Kit plugin.
Site Kit

Search for Site Kit in the plugin directory. Hit the button twice to install and activate.

Check the box to connect with your Google Analytics account, so you don’t have to do this twice.

If you have multiple Google accounts like I do, then you have to choose which one you want to use.
I’ll select my business account and move to the next page.
Site Kit wants access to the visitor data that Google is already collecting. This just allows you to see the data in your WordPress dashboard.
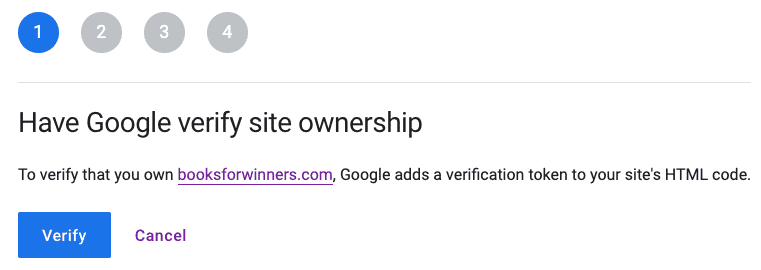
There are four steps to activate Site Kit in your new WordPress blog. The first step is to add a pice of HTML code to prove that you actually control the domain. Site Kit makes this super easy.
If you want to do this manually, you download a file from Google and then upload it to your server using FTP.
With Site Kit, you just hit the blue “Verify” button.

The next step is to turn on metrice in your dashboard. This will allow me to see all my Google data without leaving my blog. It makes looking at data more convenient. Hit the blue “Allow” button.
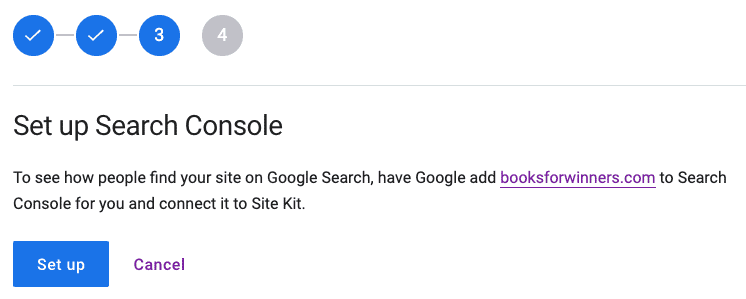
In step three, we track how people find your website. This will let me know what search terms people are typing into Google before visiting my website.
This is how you find your best performing articles.
Hit “Set Up” and Site Kit will handle this automatically for you.
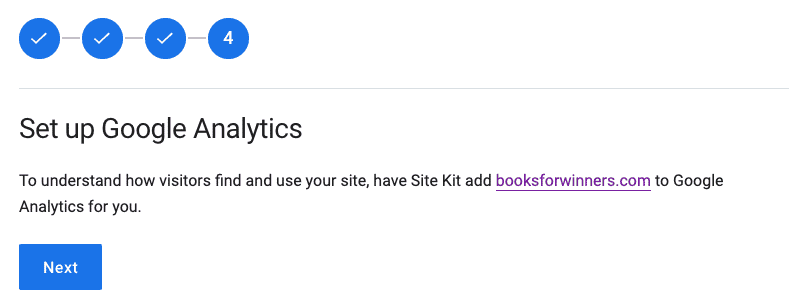
Finally, it’s time to turn on Google Analytics. This final step takes a few moments but it’s fairly painless. Hit “Next” to start the process.
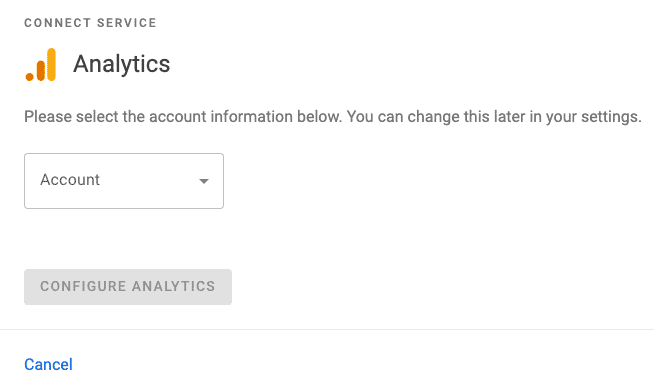
In this step, you need to choose which Google Analytics account to connect to your site. IF you’ve used Google Analytics before, select your site from the dropdown.

If this is a brand new site, like mine, you’ll select “Set up a new account.”

Here is the very long Google Analytics Terms of Service Agreement. It’s worth reading to undesrtand what data they will collect and what tehy are allowed to do with it.
If you want to get a lot of traffic to your blog, you have to accept and move forward.

Next, you will be asked to choose which Google account you want to use again. Select the same account you did a few minutes ago.
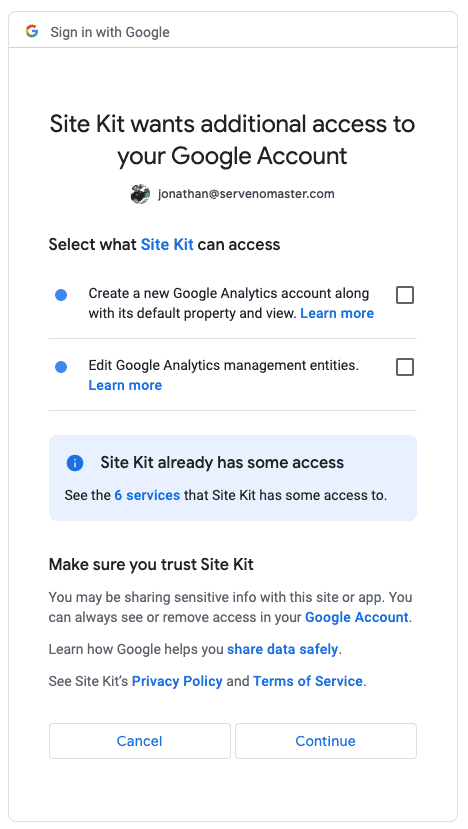
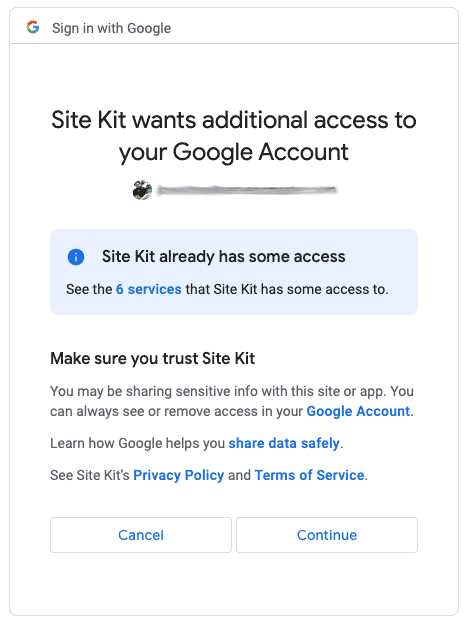
You will be asked to give Site Kite a little more acess to your Google account.
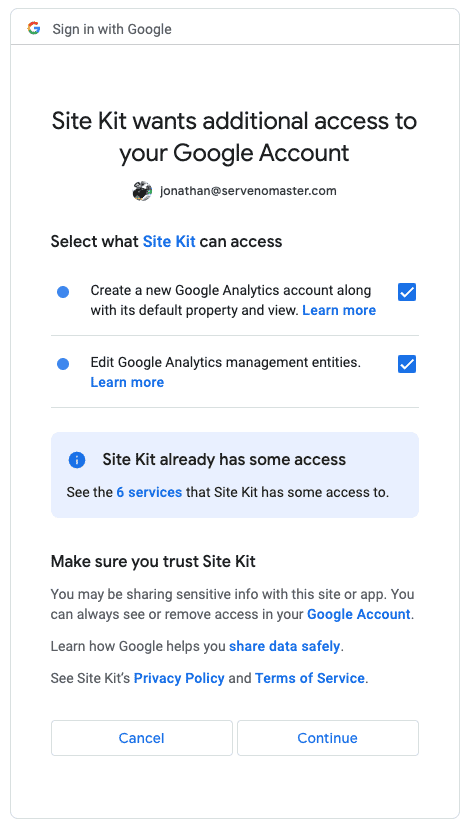
Click on the two boxes so they turn blue and then cilck on “Continue.”

Fill in the data you want here. The only thing you should change is the time zone.
Click on “Create Account.”

Congratualations Site Kit is set up and connected to your account.
Click on “Go to my Dashboard” to see Site Kit in action.

This is a brand new website, so it will still say “gathering data.”
Everything is working and you’re ready for the next step.
Rank Math
There are a few plugins designed to optimize your site for search engines.
Google looks at nearly 200 factors when determining where to rank your website. And those factors change every three months.
Keeping up with all of that information is a full time job and it’s exhausting. A decade ago you had to do it manually with spreadsheets.
No longer.
You can use the free Rank Math plugin to do the heavy lifting.
This is a newer plugin for SEO and it’s taken the world by storm.

Search in the plugin directory for Rank Math to install and activate the plugin.
There are a lot of settings inside or Rank Math. Only turn on the modules that you’re going to use.
To get started, turn on the following modules:
- 404 Monitor – will let you know when someone tries to go to a page that doesn’t exist.
- Link Counter – tracks links to and from each blog post
- Redirections – redirect visitors from old to new links
- Schema – optimizes your post type for Google
- SEO Analysis – helps to optimize each blog post
- Sitemap – provides search engines with a map of all your public content
You can turn on the other modules if you find them useful. I don’t like Instant Indexing, becuase I often change a post a few times after publishing it so I want to wait until the final version before telling the search engines.
But that is purely personal preference.
In the sitemap settings, you can decide if you want to include images and if there are any posts or categories you want to exclude. If there are any blog posts you want to keep secret, this is where you can make that setting.
If you don’t have any secret content, leave this page unchanged.
The 404 Monitor will tell you any time someone visits a page on your domain that doesn’t exist.
You can check if it’s working by opening a new browser window and manually typing in a URL that you know doesn’t exist.
If Rank Math is working correctly, that fake page will show up on this page immediately.
If a non-existent page is getting a lot of traffic, you can se up a custom redirection for that link. Visitors will then see the page you want instead of your 404 page.
Under the Redirections settings you can set more rules. If you want everyone who puts in a wrong link cna go to the homepage, a differnet page or the regular 404 page.
Make sure to turn on “Auto Post Redirect.”
If you ever change the link of a page or post on your blog, this will automatically point visitors from the old page to the new.
I use this feature a lot.
Link Whisper

Link Whisper is a more advanced SEO tool that helps with internal linking.
Basically, Google likes if related pages on your website link to each other. This gives visitors a better experience, they spend more time on your site and Google rewards you with more traffic.
As your blog grows, it’s hard to remember all of your posts and their exact links. Link Whisper handles that for you.

Link Whisper tracks all the links in your blog posts looking for problems and letting you know your overall statistics.
The most important overall stats are your Orphaned Posts, Broken Links and 404 Errors. If you delete a post without updating the link to it, you will start to throw broken link and 404 errors.
A broken link is when someone clicks on a link that doesn’t go anywhere. A 404 is when they arrive at a link that doesn’t exist, such as in my Rank Math example above.
A broken link you can fix by going to the page with the wrong link and updating it to the correct new url. For example, if a website I’m linking to disappears, I need to change the link to a new website.
A 404 error means the broken url is on my site, but a broken link can be anywhere I’m pointing to.
An orphaned post is a post that no other post links to. Google doesn’t like that.

Link Whisper allows you to create autolinking rules. So anytime you type a phrase that becomes a link.
Here you can see that anytime the words “girl gets ring” appear in a post, a link to https://servenomaster.com/girlgetsring is created.
This saves me having to manually create the link each time I talk about the first book I published.
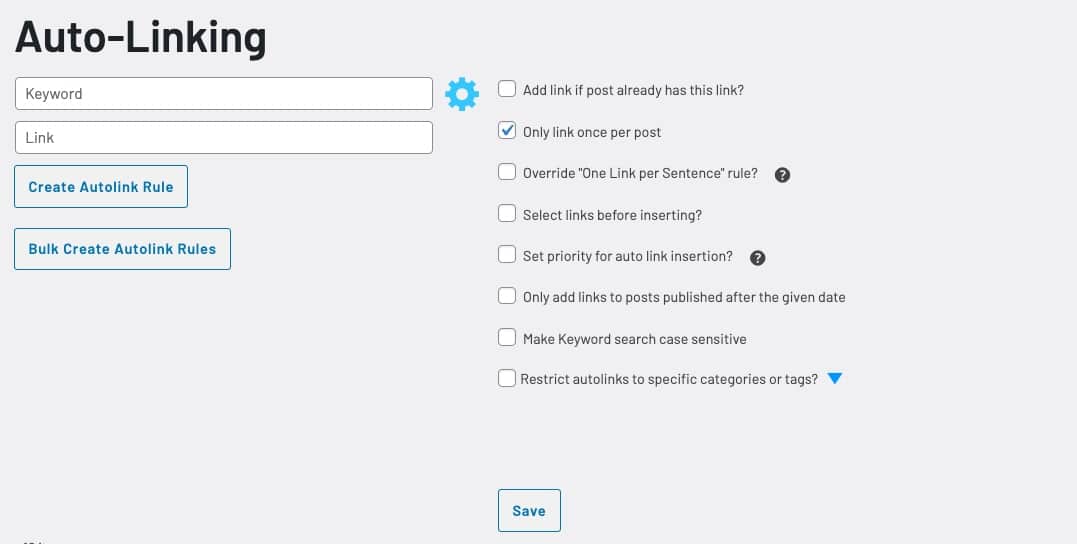
You can customize your autolinking rules by hitting. the gear icon.
The only box you should check is the 2nd box “only link once per post.”
This keeps a post from having a dozen links to the same place and getting messy. Leaving the other boxes unchecked keeps a post from getting crowded with links.
Later on you can look deeper into the settings, but these are the simplest settings.

Link Whisper will give you statistics for every single post for outbound and inbound links. We want a good mix of links to improve our rankings in search engines.

Click on “Inbound Linking Suggestions” at the bottom of a blog post to see the recommendations from Link Whisper.
Not every recommendation makes sense, so you need to ehck each suggestion manually and only approve the ones that you want.

You can create boundaries on teh suggestions. If you want to really silo your site, then only posts from teh same category will link to each other if you check the first box. The second box lets you use a tag to create your silo.
It really comes down to how strict you want to be. For a new site, I leave these unchecked because you don’t have enough content to limit your linking options.
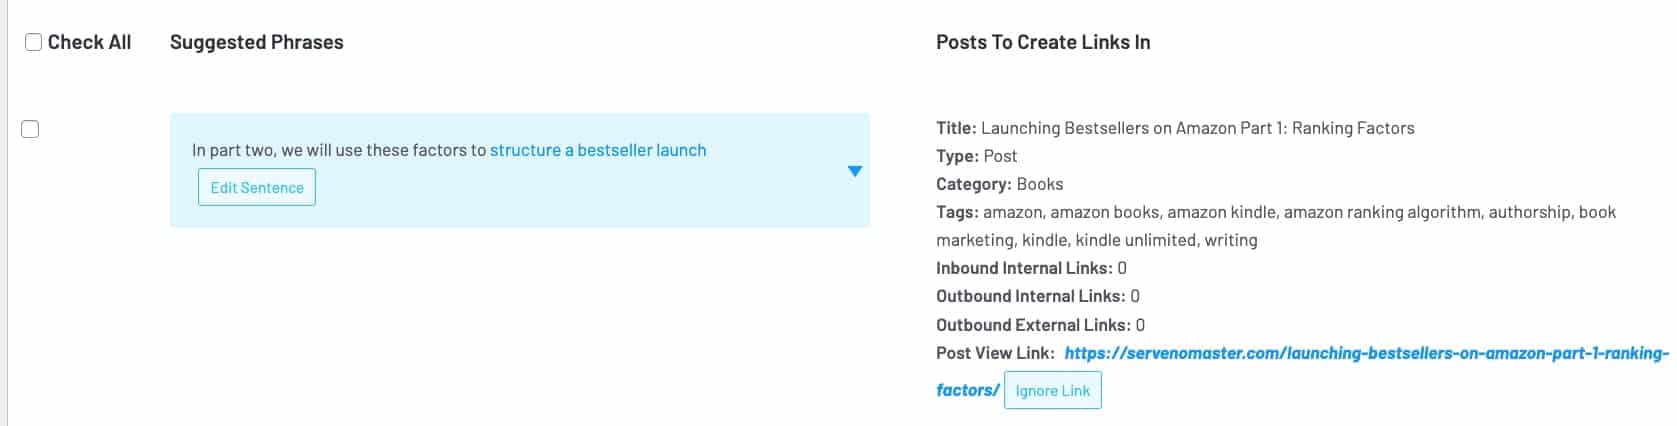
This is what a link suggestion looks like. In this case, Link Whisper is suggesting a link from my post Launching Bestsellers on Amazon Part 1 to Launching Bestsellers on Amazon Part 2.
This makes sense since they are part of a series.
The highlichted blue test “structure of a bestseller launch” will become the link. If I want to customize which words are the anchor text, I can click on “Edit Sentence.”
If the link is acceptable click the checkbox on the left and then “Insert Links Into Post” at the bottom of the page.
The process is the same for inbound and outbound links for each post.
Speed
Google recently made speed a ranking factor and with the advent of the Google Page Speed Insights, it’s no longer optional. Slow websites will get pushed down the rankings until you speed up your site or all your traffic disappears.
You can read my detailed article to learn about all the ways to speed up your website and pass Google Page Speed Insights, I have an more detailed article.
With a new site on one of the hosts I’ve recommended, we already have a fast site.
WP Rocket

There are quite a few plugins that claim to speed up your website using caching and other tools. After a lot of testing. WP Rocket is the best.
None of the other plugins even come close.

To get started, keep the Rocket settings simple. Under Cache, check the box next to “Enable caching for mobile devices” and set the cache lifespan to 10 hours.

On the File Optimization Page, you’re going to check these five boxes:
- Minify CSS files
- Optimize CSS delivery
- Minify JavaScript files
- Load JavaScript deferred
- Delay JavaScript execution
I have some additional code added to a few boxes for my podcast player from BuzzSprout, my favorite podcast host and because I’m using Kadence Conversions for my popups.
If you are going to use Kadence Conversions, then add these lines to the CSS safelist:
/wp-content/plugins/kadence-conversions/(.*).css
/wp-content/plugins/kadence-conversions/(.*)/(.*).css
/wp-content/plugins/kadence-conversions/(.*).scss
/wp-content/plugins/kadence-conversions/(.*)/(.*).scss
And add these to the Excluded JavaScript Files:
/kadence/assets/js/navigation.min.js
mobile_menu_breakpoint
kadenceConfig

On the Media tab, click on the boxes for:
- Enable for images
- Enable for iframes and videos
- Replace YouTube iframe with preview image
- Add missing image dimensions
There are a lot more features that Rocket offers to speed up your site, but these are enough to get started without it getting overwhelming.
Step 10 – Start Writing Blog Posts
Now that you’ve set up the foundation of a great blog you can start writing content.
When I started my first blog in 2007, I thought of a blog as a personal diary and I never expected anyone to find my website let alone read it.
The world has changed a lot since then and now every single post I write is with the intention of being found. I want as many visitors and readers on this site as possible.
Give Them What They Want
In order to write content that will get readers, you must research your audience to find out what they are looking for.
People are always happy to tell you what they like and don’t like. All you have to do is listen. One of the first places to start is looking at what people are searching for.
My favorite keyword research tool is Ubersuggest. I use it to find article ideas all the time.
Ubersuggest

Ubersuggest pulls data from Google and organizes it in an easilty digestable forma. You can look for new keyword ideas, find how your past articles are performing and check your overall website health.
Ubersuggest has a great free version that’s more than enough to start your blog.

You can search for keywords to see how competitive they are and how many people are searching for that term each month.
For a new blog, stick to keywords that are in the green. They are the lowest level of difficulty and you have a chance of ranking for them, even with a brand new blog.

The best research tool is search by website. Type in the url of a competitor’s website to see the keywords they are ranking for. Rather than diving deep on just one idea, you will get a breadth of keyword ideas.
I find this search much more useful as I don’t need to have a starting keyword idea. Every time I find a new competitor in my research, I run them through Ubersuggest for keyword ideas for my next batch of articles.

It’s very important to check the health of your webiste on a regulare basis. I find a new issue nearly every single week on my website. There is always a small issue with a new blog post, a broken link or an image that needs to be updated.
The site audit is where you will catch these issues.

A quick audit will give scores for:
- on-page seo
- organic monthly traffic
- organic keywords
- backlinks
You want all of these in the green. If one of these is yellow or green, it’s an issue you need to fix immediately.
Below you will see the issues that need correcting in more detail. Most of these issues can be corrected in less than five minutes.

The second set of data is pulled from Google Pagespeed insights. You want to be as deep in the green as possible.
This score is usually an average across your entire domain, so one slow page can pull down the score for your website.
My load time was over 8 seconds a month ago, so my average is still going down. I definitely want to get out of the yellow as quickly as possible.
Surfer SEO

Surfer is my secret weapon for optimizing my blog posts for search engines. I’ve tried a lot of competitors and right now nobody is even close. There are a a lot of tools inside of Surfer, but my favorite is the Content Editor.

Once you find a great keyword for an article in Ubersuggest, paste it into the Content Editor. Hit the purple button to create your new document.
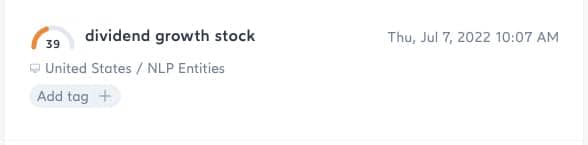
Immediately, you will get a score for your new article. I have a 39/100 for this article.
You get a limited number of content editors each month, so it’s worth using all of them. They don’t roll over, but once you create a new document it stays in your account.

As you write your article, the meter will go up. There are four main metrics that Surfer uses for the meter:
- Words
- Headings
- Paragaphs
- Images
Each of these comes with a range based on other blog posts that are currently ranking on page one for the search term. Once you have all four main categories in the green, the overall score should shoot into the green as well.

Surfer does more than just score your work, it also guides you in creating your content. The Outline generator will help you find titles and headings for the sections of your aritcle. It will also give you the best questions to answer in your article.
This is really useful. Normally you have to use an expensive service to find these questions.
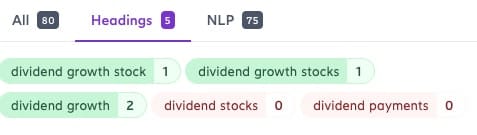
As you’re writing your article, Surfer will recommend keywors that should appear in headings. As you use each keyword in a heading, it will chagne from red to green. This ensure that you have sections about the most important topics.

Surfer will also tell you how many times to use each keyword in your article. It is nearly impossible to turn every keyword green, so don’t take it too far. Find the balance between optimization and readability.
Any overall score of 66/100 is going to do well for you, but I try to get as close to 100 as I can without losing the quality of my content.
I run every new article through Surfer and I also optimize old content. When I rewrite n article with Surfer, I always see a bump in traffic.
Jasper

There are a lot of artificial intelligence writers entering the market. Jasper is the best by a wide margin. They were one of the first platforms in this space and they have the smartest AI writer.
There are a lot of features and ways to create your content using Jasper and as you get better the tool gets more effective.
It’s important to understand that Jasper is an assistant not a replacement. Everything Jasper writes is for my rough draft. I still read, edit, check the research and clean up every single sentence manually. Jasper just makes the process much faster.

Jasper can create dozens of content types and blog posts are just one of them. If you need help coming up with a title for your post or an outline, Jasper can handle it. I use Jasper on nearly every article I write now.

The real magic sauce with Jasper is the recipes. They have some pre-built recipes for blog posts that are really helpful. You can start with a keyword and have a decent rough draft ready in less than ten minutes.
That’s a huge timesaver and it’s how I block out many of my articles.
Jasper gets really exciting when you start to design your own personal recipes. I have create a special recipe for my product roundup posts that saves me hours on those articles.

The Japser editor is a really powerful word processor. This looks like a blank page, but taht’s not what is happening. You can hit one button and Jasper will start writing while you sit back and watch.
Jasper is one of the best ways for writers to create more content faster. It’s one of my secret weapons for scaling my blog.
ProWritingAid

AS I’ve passed my fortieth birthday, my hands seem to have become dyslexic. I’ll write many words with the letters out of order. It’s very frustrating and if I don’t fix my spelling issues, readers will think that English is my second language. Or that I don’t speak English at all.
ProWritingAid has a free grammar check plugin that I use all the time to fix sentences before I publish my content. This polishing is something that your readers will really appreciate. ProWritingAid makes everyone look like an English master.

If you saw this unedited paragraph, you might just think that I’m an idiot and ignore the actual quality of my content. Some of the words are inscrutable until I fix them. ProWritingAid helps me fix all these mistakes in a matter of minutes and it makes me look a lot smarter.
Most of the mistakes are in my hands, but nobody ever assumes that. When you see a word misspelled you assume that the problem is in my intelligence.
I can’t recommend ProWritingAid enough to make you look smarter.
How To Write A Good Blog Post
This is where creativity comes into the picture. If you use the tools I’ve shared with you, then you can assemble blog posts rather than write them.
This blog post is one of the longest that I’ve ever written at more than 15,000 words. Surfer tells me the article needs to be that long or you’ll never see it.
When I write the first version of this post in 2016, it was a LOT shorter. Competition has increased.
Trying to write a blog post from start to finish in a single session without outlining first is the slowing way to create content. Instead, work on multiple ideas at the same time.
Find a bunch of keywords you want to write articles for, then create multiple rough drafts in Jasper at the same time. I have 10-20 blog posts in the production process at any given time. There is always something I can work on that fits my mood.
There is no perfect formula for a blog post. The best way to create great content is to give readers what they want. And you can find that by looking at other posts on the same topic and then adding your own spin.
This article is about 80% research and 20% my way of doing things. That way I give you what you’re looking for and I have enough unique information that the content can stand on its own.
Choose Your Blog Style
The most important part of any blog is consistency. Your content should have a similar style so that readers get what they expect. If you want to write really personal content, then that should be embedded in every single post you write.
If your writing a business blog, then people will expect very formal language and style.
There is no wrong way to create content, as long as the content across your site feels like it belongs together.
More than anything, blogging takes practice.
When I was writing a diary-style blog, I was able to write 5-6 posts every day. My content required no research, I was just writing about what happened each day.
Now that I have to do extensive research for each article, my posting speed is much slower.
This blog is a lot less personal and far more instructional. Because that’s what my readers expect.
Look at competing blogs to see what readers like and use that to plan your take on the genre.
Step 11 – Promote, Market and Grow Your Blog
Writing blog posts and hoping that good quality content is enough won’t work. That’s the advice that a lot of blogs give, but it’s a lie.
It doesn’t matter how great your content is, you have to actively find readers.
You have to make a conscious decision to grow your blog and that means a lot more than just writing content.
Write it and they will come
This field of dreams nonsense just isn’t true I see this happen to authors all the time they spend weeks or months writing and editing their book and when they finally published Amazon they think their job is done
I see this happened to authors all the time. They spend weeks or months riding and adding their book and then it’s finally done. They upload the book to Amazon. And then they wait for the sales to roll in.
Unfortunately that’s not how it works. Your job starts when you finish writing your blog post. Now it’s your job to let people know the content is out there and to do everything you can to make that content available.
You can’t rely on the quality of your content to find readers. You have to actively seek those readers out.
Be active in your niche
If you want to grow a following, you have to start planting seeds and this means being active wherever your audience is spending time.
Visit the websites they visit, join their favorite forums and participate on the right social networks.
Different age groups and niches are active on different platforms, so a little research will help you to spend your time wisely.
Comment on relevant Blogs
We all want visitors to post comments on our blog posts and to share them across their social networks. If you want your visitors to do this, you should do the same thing when you visit other blogs.
When you become a frequent poster, other people will start to notice you. Readers will visit your blog to see what else you have to say.
There is a good chance that the owner of the blog will visit your site and this can lead to guests post, interviews and podcast appearances – all things that will help grow traffic to your blog.
Answer Questions on Quora
Right now Quora is the most popular question and answer forum. In the past it was Yahoo answers, but that is long gone.
This is great place to hone your writing skills.
Focus on providing the best answer to each question you can and dont’ worry about linking to your blog just yet. Initially, you want to hone your answering skills.
Once you start to get a lot of upvotes for your answers you can start to link to relevant posts on your blog.
Following this process will allow you to build credibility before promotion and will really pay off in the long run.
Post on Forums
Look for forums where your ideal reader spends time. Join in the conversation and get your post count up. Once you start to get a lot of comments and positive feedback on your posts, you can add a link to your blog to your signature.
This is similar to the Quora strategy of building up your credibility before asking people to visit your site.
A little effort can go a long way. when you do this in the right order.
social media marketing
A lot of people will judge a brand based on the size of it’s social media following. Thats because this is the easiest metric to measure.
The secret to social medai is using content from your blog post to create content and scheduling it in advance.
Trying to post new content every single day is exhausting and you don’t have time for that when you’re growing your blog.
Later

Later is how we schedule content to all your social channels to promote the Serve No Master blog and the podcast.
The further in advance you schedule your content the less stressful social media will be for your new blog.
We try to be at least three months ahead on baseline content and sometimes create content a full year in advance.
guest blogging
Guest blogging is the core way we drive traffic to this website. Without guest blogging, you would never have seen this article.
Guest blogging benefits your website in two ways.
First, it gets your content onto websites that already have traffic. People will read your guest post, click on the link and visit your website directly.
Second, guest posting is the best way to get backlinks to your website. A back link is any link on another website that points back to your site.
Thi is the main way Google ranks websites. The more backlinks you have from respected website, the higher your articles will rank in their search results.
This can be a lot of work but the payoff is also the biggest and will drive the most organic traffic, it just takes a while to start seeing results.
Repurpose Content
You’ve taken the time to create an amazing blog post, why not reuse that content across your social channels?
Trying to create social content on top of writing blog posts is simply exhausting and it’s very hard to keep up.
Repurposing your content means converting it into different formats to post on other channels.
Lumen5
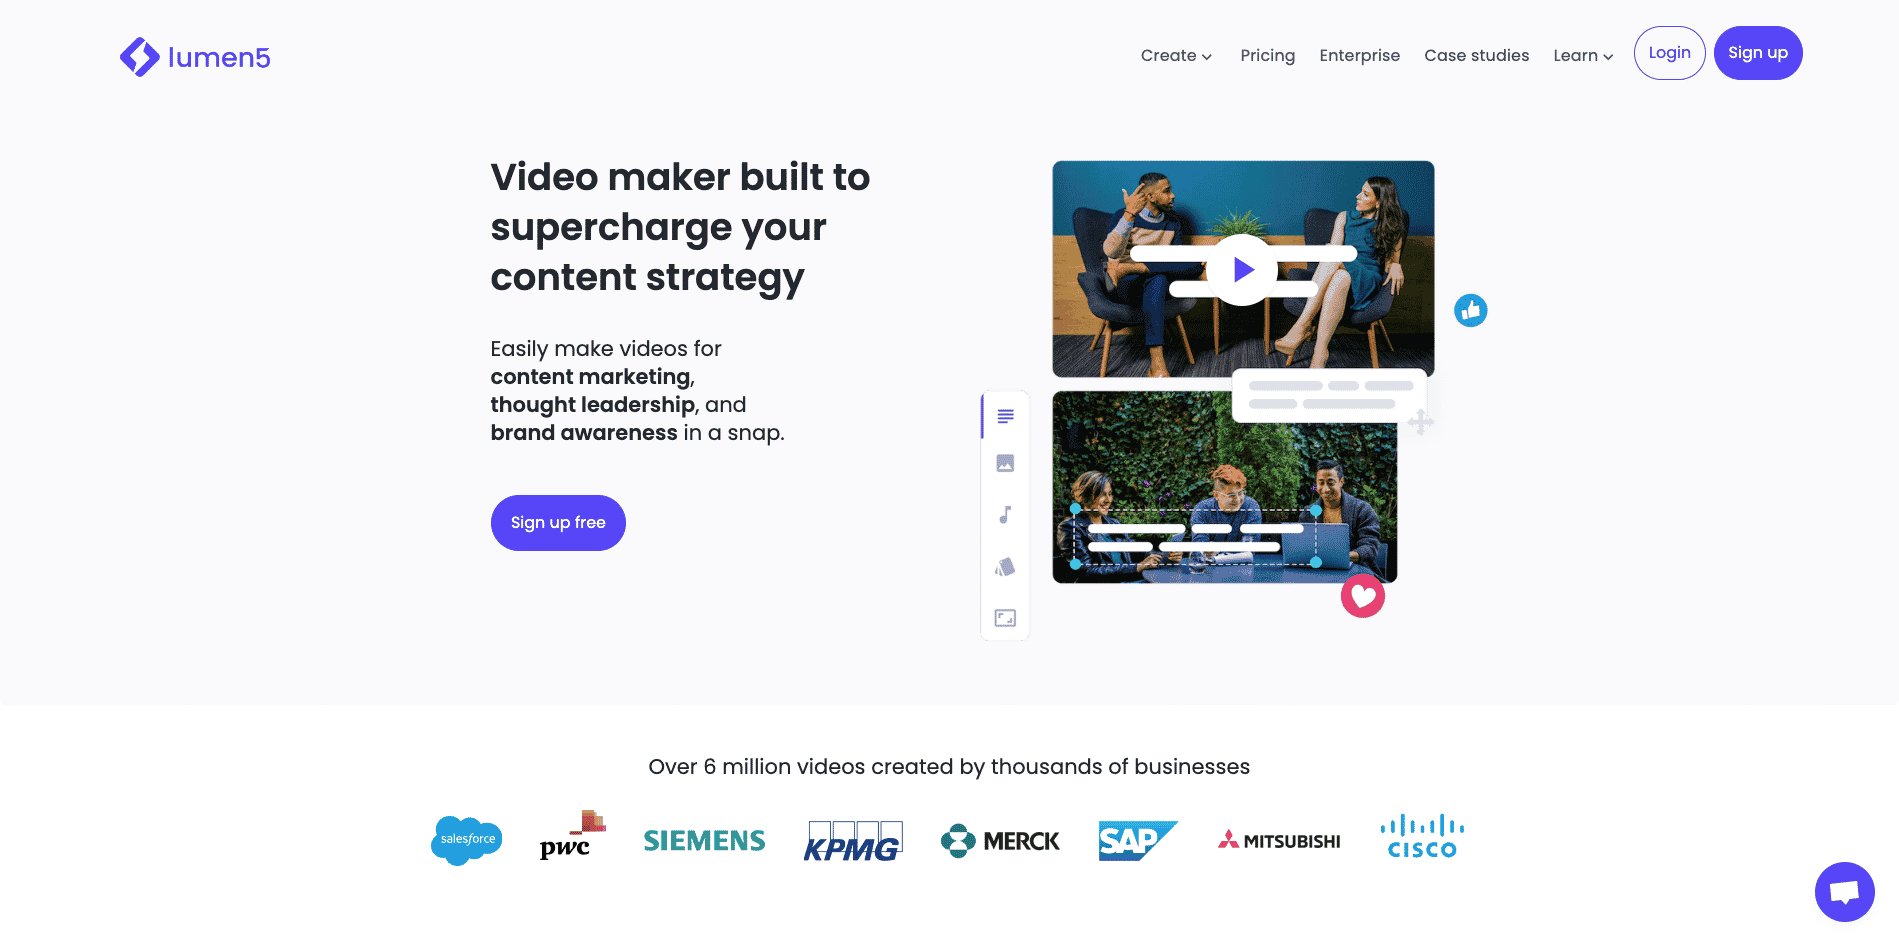
Lumen5 will take your blog post and turn it into a video. This makes publishing your content on social media a lot easier.

When you load up Lumen5, it will give you a selection of templates to choose from

Once you choose your template, it’s time to choose a format. Will your video be vertical, horizontal or square? Different social networks want different shapes.

Lumen5 will use your existing blog post to create the video. The first step is to past the link to your blog.

Then you’re going to hit that purple “IMPORT” button and give Lumen5 a moment to pull in the text from your website.
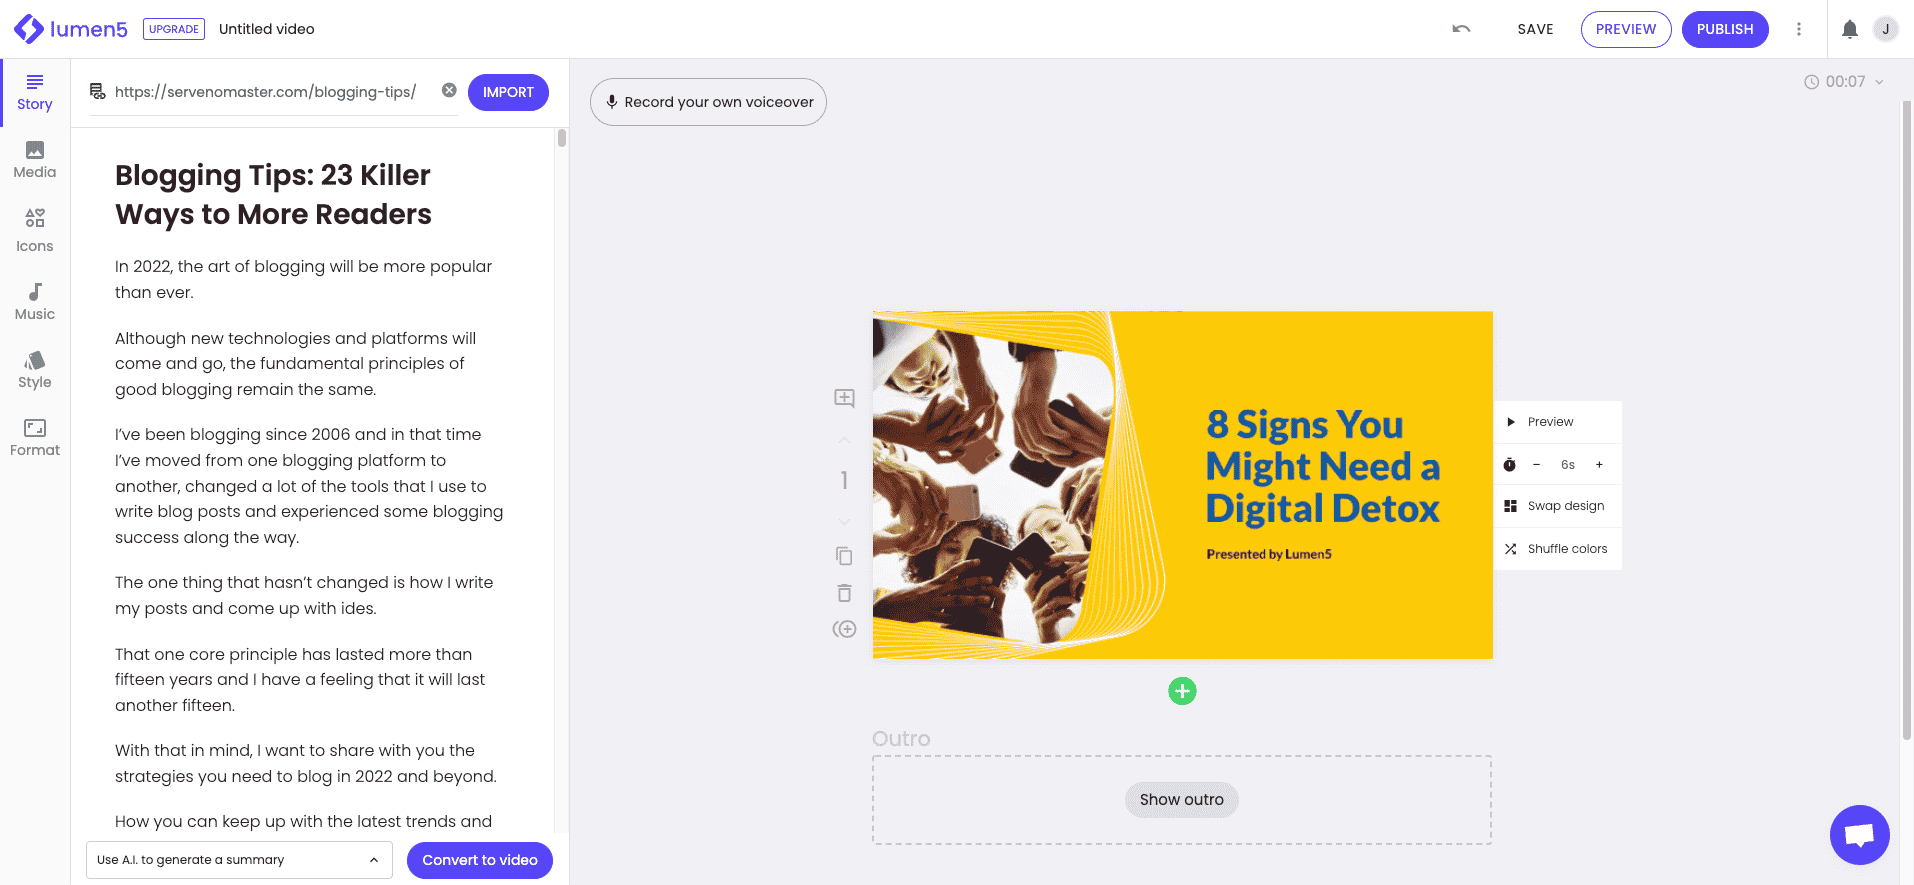
The text of your post will appear in the lefthand column and you have a chance to edit and remove anything you don’t want in the sciprt. You can even choose to record your own voiceover. When you’re ready hit the “Convert to video” button.

Lumen5 will give you a few options for the style of your video. These are all variations on the original template you chose in the first step.

Lumen5 provides royalty free music to add to your video. You can mark your favorite songs to use later or upload your own music.

Under the style tab, you can choose a new color palatte or create a cutom set of colors based on your brand.

Switching to the Wistful palette completely changes the look of this video.

You can add stock photos to your video to take it to the next level.

Before publishing, you can change the format of your video if you want to post it on TikTok instead of YouTube.
When everything is ready hit “PUBLISH” in the top right corner.

Your video is now ready to download and post across your social channels. This video took me less than three minutes to create.
Repurpose

Once you’ve posted your Lumen5 video to YouTube, you can use Repurpose to post the content to all your other social channels. This tool gets more traffic to my blog than everything else combined.

You can connect Repurpose with many social networks and cloud storage locations. It’s designed for moving content btween your social networks as easily as possible.

I have many active connections inside of Repuprose to quickly move content between channels.

You can create custom templates for your videos. When moving a video from one shape to another, these templates provide consistency. The grey space is where the old video will go.
When changing a video from YouTube to TikTok these templates keep from cutting off the sides of the video.

The real magic of Repurpose is in the workflows. You can move a video from YouTube to Instagram Reels here.
When you add a new workflow, you have the option of copying the entire original video or cutting clips. With clips, you can watch each video in Repurpose and mark your start and end times. Repurpose will do the rest.

With one click my TikToks are reposted as Instagram Reels and YouTube Shorts.

In less than one month, Repurpose has generate over 70,000 views on my YouTube channel without my ever logging in to YouTube or creating new content.
Repurpose is my favorite social media tool and it’s only getting better. I can’t recommend it enough for driving traffic to your blog.
Step 12: Make Money From Your Blog
You’ve put in a lot of hard work to get here and this is a very exciting step. It’s time to transition your blog from passion to profit.
I’ve been making money from my blog for more than a decade and I always love this part.
Build a mailing list
When someone visits your blog, you have one chance to make money. Once they leave you have no power in the relationship. Your blog is passive marekting.
Email markteing is active. When you give your email address to me, I have the ability to send and email on my schedule. That’s active.
Instaed of one chance to make the sale, I get one chance every single time I send an email.
The majority of the revenue from this blog comes from email marketing.
GetResponse

GetResponse is an email platform designed for marketing and bloggers, by marketers. It’s one of the easiest ways. to get into email marketing and you can start for free.
You can build a mailing list of 499 people without spending a penny. That’s plenty of time to grow.

You can create an opt in form or popup insside their dashboard. This is a form where you ask for a visitor’s email address.

A popup will be slightly different to an embedded form, such as one you put into the sidebar of your blog.

GetResponse has hundreds of templates to choose from that match each style and color of blog. These templates are infinitely customizable and the sky is really the limit.
Just getting a form onto your website so that visitors have the option of joining your mailing list is a huge step.
Run Ads

This is how most bloggers earn their first dollar online. Google Adsense will place ads on your website based on the content of your articles.
Each time a link is clicked, you get paid.
This is a great starting point, however, there are other networks you can join that pay more as your blog grows. Some of the best advertising networks require a certain amount of traffic to join.
Start with Adsense and as you grow, look for opportunities to increase your revenue.
Sponsored Posts and Placements
Websites and brands will sometimes pay for a sponsored post or ad placement. With an ad, you get paid simply for the ad being on your site. This means you get paid no matter how many people click or don’t click the ad.
With a sponsored post, an advertiser will pay a one time fee for you to write a post about one of their products. Sometimes you can negotiate a fee to keep the listing active. When they stop paying, you can remove the post from your blog.
These methods both require you to seek our brands and negotiate directly.
You can wait for them to find your blog and email you out of the blue, but you’ll get paid more and close deals faster if you approach multiple brands to sponsor your blog.
Affiliate Marketing
With the previous methods, you. get paid when people see or click on an advertisement. With affiliate marketing, you only get paid when you generate a sale. This can be very lucrative if your blog visitor are making purchases.
This is my preferred way to generate revenue as I have total control over which products I promote and I get paid based on the quality of my work. The more sales I generate, the more money I make.
Builderall

Builderall has a great affiliate program that is very beginner friendly. They offered dozens of tools for a very reasonable price and customers love this product.
They provide tools for copywriting, creating membership sites and building an audience online. If you’re not an affiliate already, you should definitely sign up for their program.
A2 hosting
Most blog hosts have great affiliate programs and what easier place to start than recommending the company that hosts your webiste?
I’m a big fan of A2 hosting for two reasons, they are very fast and they have a great affiliate program. If they didn’t have the first, the second wouldn’t matter.
Why not get paid to recommend the best host at that price?
Sell your own Products and Courses

I’ve saved the best for last because it’s the most work. Once you find what products your customers like to buy, why not make your own version?
You can offer coaching and consulting from day one. As you develop new skills, you can create courses to sell your audience.
Here is an example of my course on growing your blog into a full time income.
Scale Your Blog
Scaling your blog means increasing your output. Putting out more posts with better content and better graphics. This is how a blog grows.
Before Ford invented the conveyer belt, a single expert would build an entire car from start to finish. Then he would start on the next car.
This required one person to be an expert at every single part of the car creation process and it was horribly inefficient.
Many bloggers start out the same way. The find an idea for a blog post, research the keywords, write the post, edit the post, format the post and publish the post all in a liner fashion. Only after the last post is published do they look for an idea for the next post.
If you break your blog creation process down into these component steps and work on multiple posts at the same time you become much more efficient.
Track Blog Creation Phases with Clickup

This is my real blog creation board inside of Clickup. Each column is a different phase of my blogging process.
Rather than follow one card across the columns from start to finish, I have at least 20 active posts at any given time.
Spend a few hours coming up with great blog post ideas using Ubersuggest and add all of those as new cards in Clickup. Then have a research session where you gather all the facts you need to write each post.
I sometimes watch a movie and create rough drafts of ten blog posts using Jasper. It requires more time than attention, so I don’t have to be fully engaged during that phase.
Using the conveyer belt system will keep you ahead of schedule and you never have to do something you dont want to.
If you don’t feel like writing a post, you can focus on formatting, research or keyword optimization.
The conveyor belt keeps this blog months ahead of schedule and removes most of the stress from the blogging process.
How do bloggers make money?
Bloggers make money by including links to products in their posts. They can get paid per view, per click or per sale depending on the advertising network they are working with.
How can I start blogging as a beginner?
If you’re thinking about starting a blog, there are a few key things you need to do in order to get started on the right foot. First, you need to choose a topic or niche that you’re passionate about. This will make writing your blog posts much easier and more enjoyable. Once you’ve chosen your topic, you need to come up with a catchy name for your blog and create a logo. Then, you’ll need to set up your blog on a platform like WordPress or Blogger. Once your blog is up and running, start promoting it through social media and other channels. Finally, be sure to update your blog regularly with fresh content to keep your readers coming back for more. If you follow these steps, you’ll be well on your way to becoming a successful blogger.
How do you start a blog for free?
One popular way to start a blog is to use a free hosting service like WordPress or Blogger. These platforms provide everything you need to get started, including templates, hosting, and support. All you need to do is create an account and choose a name for your blog. Once you’ve done that, you can start writing posts and publishing them to your blog. You can also customize the look of your blog by choosing a theme and adding widgets and other features. Starting a blog on one of these free platforms is a quick and easy way to get started without any upfront costs.
Can I start a blog for free and make money?
There are a number of ways to make money from blogging, and many bloggers start by simply selling advertising on their site. However, it is also possible to start a blog for free and still make money. One way to do this is to sell products or services through your blog. For example, you could sell e-books, online courses, or other digital products. You could also sell physical products, such as jewelry or crafts. Another way to make money from blogging is to use affiliate marketing. This involves promoting other people’s products or services on your blog and earning a commission for each sale that you generate. Finally, you could also provide consulting services or offer expert advice through your blog. By providing valuable content and building a loyal following, you can turn your blog into a profitable business.
Is blogging worth it in 2022
Blogging has come a long way since the early days of the internet. Once a platform for personal diaries and amateur thoughts, blogging is now big business. Top bloggers can earn millions of dollars per year, and many companies see blogging as an essential part of their marketing strategy. So, is blogging still worth it in 2022?
There are some key trends that suggest blogging will remain popular in the coming years. First, we are seeing a resurgence in long-form content. As people increasingly consume content on their smartphones, they are craving in-depth articles and thoughtful essays. This trend has been fueled by the success of Substack, a platform that allows writers to publish and charge for their work. Second, we are seeing a growing interest in niche topics. As the internet becomes more saturated with content, people are looking for information on specific topics that they are passionate about. This has created opportunities for bloggers who can provide niche insights and perspectives.
Overall, it seems that blogging still has a lot to offer in 2022. By capitalizing on key trends, bloggers can continue to find success and build an audience of engaged readers.
Final Thoughts
So there you have it- the perfect recipe for a successful blog in 2022. All that’s left is to get started! Share a link to your blog so I can be your first reader and leave me a comment letting me know how you plan on implementing some of these tips. Thanks for reading, and I can’t wait to see what you come up with.
Want to get more blog subscribers and build your fan base? Download my free guide "Get Your First 100 Fans" Click here to get the guide.


OMG I never thought starting a blog was this easy. I’m a consultant for a network marketing company, and my team has been really excited to tap into the internet. The problem is, none of us have any clue where to start.
This guide makes it really simple. I tried having my son explain how to blog to me, and I know that he knows what he’s doing. It’s explaining it to people like me that’s difficult.
I can’t wait! I’m going to do all of the technical stuff first, and then move on to making my first blog post. I had no clue any of this stuff was going on, and to be honest I didn’t even know what GoDaddy was. Jonathan, you made it really simple for an old timer like me!
Some great stuff in here. I’m starting a new blog right away, about water filtration and how to get clean, healthy water for your home. I’m an expert in the subject – ok, not the world’s foremost authority or anything, but pretty knowledgeable, and I know what to write about.
Thanks for this clean and relevant post. I really didn’t know how vulnerable I was to attackers, but I feel really safe getting started now.
I’m a big fan of your writing, and have been listening to your podcast for a while. My favorite part is that you open up the world of internet marketing and business for newcomers. You broke down the process of starting a new blog, step by step. You even revealed what to watch out for, in terms of domains and hosting companies.
I LOVE this series. I don’t know what I want to write about yet, but I know what interests me, and I love sharing with like-minded people. I think this will be an incredible tool to get my foot in the door and begin something in the area of communication.
What Jonathan Green says about blogging, domain and hosting companies is correct. I personally choose WordPress for many of the same reasons as he does.
First off, it’s an open source platform. This means that people can begin using it for free. Also, because there’s such a huge community developing plugins, templates and other integration software for it, there’s huge access to exactly what you need for your blog.
Second, buying a domain is a tricky process. He navigates through the treacherous waters, and holds your hand so that you’re off to a great start. One of the major things that I’ve learned in business is pointed out right at the beginning of the article. If you aren’t thorough and build a proper foundation, you’ll have to go all the way back and start over. There aren’t any short cuts.
These are some great resources. It might seem like a huge investment to pay for a domain name, and to host your website. I think the most freeing thing that Jonathan does here, is to share that blogs are a great way to make money.
At the end of the day, the costs are a drop in the bucket once you see the dramatic amount of traffic that pulls through. To be fair, blogging about information that people like is almost free, compared to paid options, and you can experiment to your heart’s delight.
Just pay attention to what he recommends. If you follow his advice, you’ll be up and running in no time, even if you’re a beginner. To think that this competent guide is only the tip of the ice burg for this series! Keep ‘em coming Jon!
I feel quite safe following your rules about getting started. There’s a lot of information, whether good or bad, and it’s a tough job to keep readers both informed and interested.
I think you’ve done a really good job. All flattery aside, I know what it takes to gain traction in the search engines with a blog, as well as how to engage cold audiences via social media.
Recommending and teaching WordPress all the way though it exceptionally helpful, because you can embed videos to go along with the text. Because Google takes a while to index your site for the first few months, it’s really important to have content that keeps your readers on the page. When Google sees that, there’s a good chance they’ll bump up your site.
On the other hand, it’s a great way to make sales. Although beginners won’t be able to design useful widgets to help them get customers through a sales funnel to make some income, it’s possible with a little knowledge. You’re absolutely on the right track with this post.
It’s a big thinker’s guide. Although the recipe calls for starting small, this is exactly what’s required, and Jonathan tells the story honestly.
That’s why I’m comfortable with saying that he’ll help you get the big results you’re asking for. You may be looking to tap into a relatively small and focused audience, or to bolster an enormous readership. Whichever path you choose, Jonathan can help take you there. This information is congruent, and explains what it takes to get the ball rolling.
I’m going to recommend this post to a friend. I’ve been running a successful blog for about half a year now, and they’ve been badgering me to help them get started. I just haven’t had the time to design a useful tutorial like this.
There’s a lot of free information on the web about it. The difference with this blog is that the author has the results to prove that what they’re saying is true.
Sure, the first post is mainly related to the technology. But getting it right on the first go around is critical to making a blog work. You don’t want to waste your precious time and creativity, pouring yourself out for something that gets stolen from you. Even if you miss one step, you’ll be left with going all the way back to do it over again. Don’t take this for granted.
Love the info and guide, thank you! I’m currently reading your book and it’s fantastic. I figured I would get started on the blog now, why wait?! It can be found at hugyourchaos.com
It’s funny because everything in me is yelling, “no it’s not perfect yet, don’t put it out there…” and then I keep hearing your words from the book about your first website. The boats have been burned in my life. It’s go time. 😉
Hi Jonathan
keithanthonyheadley.com
I still have a lot of work to do, but writing comes easily for me. This is this best guide to creating a blog I’ve ever read. Thanks so much.
Regards,
Keith Headley
Been listening to your audiobook and looking at this blog for the past couple of weeks. Finally decided to stop being a sloth and start the instructions you have given me. Thanks for the inspiration. I am like one of the friends in your book where I other books on how to make it online, but I am starting to follow through on this one. Hopefully, I keep it going and we can work together one day.
Jeremy
ripandrun.club
Good day Jonathan,
First TWO posts are up at garrettgosselink.com . I look forward to reading your comments.
I did it! First blog EVOR. Thanks for this easy to follow guide and you’re inspiration. Give me a visit at copyhead.com
Thank you Johnathan! I wrote my first blog page.
http://modifymymind.com/
Hello Jonathan,
great work from you, it was super easy to follow this guide and to setup a blog. I’ve thought it would be superhard to just start, but now it feels almost like dream. I would appreaciate your visit, hopefully all you guys will enjoy my content. See you in future my friend and you wrote great books as well !
Hi Jonathan! I have just published my first post, after reading Serve No Master.
Thank you for sharing what you have done, and for wanting to inspire other people to break free from whatever chains they are wrapped up in. I have an excitement about the rest of my life that I haven’t had since getting married!
Laura
http://theselftaughtmom.com/2017/03/17/first-post/
Jonathan,
You’re inspiring brother. I read your book serve no master and it motivated me to start a blog. Can’t wait for your next book. Great advice here.
Jonathan,
I want to thank you for writing a book that is actionable. I thoroughly enjoyed reading Serve No Master. You made the thought of not relying on the normal 9-5 grind seem more reachable than ever. When I found the book, I was skeptical that you could make it as easy as you claim, then I started reading. After completing the book and really thinking through the next steps, my wife and I have started our first blog: http://engageempowerenjoy.com/
We are looking forward to talking about our lives and the lessons we are learning as we continue to pursue a financial free future. You have been instrumental in getting us off the ground and we look forward to offering to others what you have given to us, an opportunity! Feel free to comment your thoughts on our blog we are more than willing to take any feedback you may have to offer. Can’t wait to come back and post a follow up success story!!!
Thanks,
Darren and Lydia Gray
engageempowerenjoy.com
Wow! Thanks for all the assisting documentation that enabled me to setup this blog. I’ve been in IT Networking Infrastructure for 29yrs and I did not know how to accomplish this task! Please see my first post on the Standard American Diet.
I’m looking forward to serving no master!
Hi, Jonathan
Thanks a lot for your help
Here my URL
https://freelancerwriter.com/time-is-just-an-illusion/
See you!
Great blog name!
Hi Jonathan
I am reading through your book on my Kindle now. The more I read the more excited I get about breaking the chains. I am looking forward to working more on this and many more projects. My head is rolling with idea after idea. Yes I know, one at a time. Thanks again!
budgetcrush.wordpress.com
Jonathan,
Thanks for the inspiration from your book. It was a battle but I got it to this point in a few nights of work. Can’t wait to figure out to turn it in some income while I sit here teaching online and stay OFF the playing fields!
http://athleticdirectorhelp.com/
Cliff
Awesome. Love seeing you take action!!!
Jonathan,
Thank for for inspiring me to finally start rattling my 9-5 cage! I decided to use my site and blog to try to help other people! I’m on my own journey towards improved health and weight, getting better sleep, and generating passive income. Will it turn out to be profitable? I think it could be. If nothing else it lets people view the journey as it’s happening, rather than looking at someone wildly successful and having to have faith that when they say they were fat, tired, or broke that they are telling the truth. It’s definitely makes me feel a little vulnerable, to let people in on an endeavor (or three) that could totally implode and fail, but I feel like community accountability might end up helping everyone in the end. Anyway, if you’ve made it to the end of my little rant here, thank you immensely! Now reward yourself with a white russian!! haha.
Hi Jonathan,
I have purchased two of your books “Breaking Orbit” and “Serve no Master” I have enjoyed both of them they go hand in hand. I really enjoyed your content and the way you presented it. I came upon your book by accident but liked the summary. I have also started using a few of the writing software you recommended. Grammarly is amazing I love it!!!
I am happy with what I do currently but want more and listening to your book was just the motivation I needed. The way you presented the information coupled with the roadmap you layout was what pushed me over the edge. Thank you for putting people first, your genuine care to help others really comes across.
I posted my first blog I look forward to your comment. http://beingagentlemen.com/2017/12/01/being-a-gentlemen/
Jonathan,
Thanks for all your help. You were right – super easy to get set up. Appreciate all the good advice.
http://ericslessons.com/
Eric
Thanks for the advice. I tried this out and my website isn’t working. Maybe this information needs to be updated.
Hi Andrew,
Where di you get stuck in the process?
– J
I, too, got stuck. I completed the WP installation process successfully, but I have no idea how to get to my WP admin page to log in and build the content. There were no instructions on the resulting page as you noted, so I’m officially lost. Any help would be greatly appreciated!
Hi JG. AFter you finish installing wordpress, you want to go to Website.com/wp-login.php.
I’ll update this post ASAP to include this information.
I’ve created a simple website before but it’s been a long time. Needed to read this to get motivated again. Thanks! A small obstacle was setting the DNS servers correctly in namecheap.com. I used IP addresses instead of the FQDN (fully qualified domain name) for the Bluehost DNS servers. Once that was fixed, the site started getting transferred to my domain and it’s up and running. Feel like I have sooooo long to go before monetizing anything, though, and could definitely use a stream of income. I’m a single dad and have two teenage sons and was laid off from a tech job in April (it’s December now!). Still need to finish “Serve No Master”. I’m not quite halfway through!
Marty I’m just glad to see you taking action! I just updated this post to reflect that I now prefer Bluehost to A Small Orange. I’m recording a series of new blog setup walkthroughs with Bluehost this week.
I did it, Finally put up my first blog post. I appreciate the enthusiasm and support you offer Jonathan. I’ll probably have a book out within the next week or 2. I am looking forward to building multiple streams of income to fund the incredible life I already live on a sailboat in Mexico!!
First off, great name. Spelled correctly and everything(I know at least a dozen different ways to spell Jonathan.)
This helped me so much in getting my blog started. I’ve learned a lot on my own but couldn’t have got started without this tutorial. I just want to say thank you so much for making this easy to follow guide.
Thanks again for all the help
http://omni-practical.com
I just wrote my first post hehe. Thanks for inspiring me :). http://yongtuck.com/2018/01/29/firstpost/
So this is my first attempt. Let me know what you think and what I can do better. I am still just finding my way around WP and how to set up the pages. Its a bit overwhelming but I wanted to get that first post out there and just do it.
You book is very inspirational. I am very self driven and have owned my own “on the ground” businesses in the past. Some were fairly successful but took up all my time, some were subject to overhead changes that made making money financially difficult.
Thanks again for all the support
I can’t wait to see your blog go live! I’ll be waiting!
Finally got through the book and finally took the plunge to make my website. Obiviously its not as asthetically pleasing as Id like, but itll get there. You told us to get our first blog post up and going before it was perfect or it would never happen. So I did it! Thanks for the lessons and encouragement to serve no master!
Here’s my new website!
http://nottodaydebt.com/
I have a website and a blog, but I haven’t got to the point of seeking traffic actively. I’m partly scared I won’t be ready to serve the customers, but my e-commerce is just about enabled, and I will work on creating landing page that at least they can leave their email and I can set up a funnel to answer and nurture.. It helps me to feel better, cos a lot of mentors said you shouldn’t waste your money on all this, but I went ahead and created it. I spent a fair bit on my programmer to help me with the tech side. Which still have him, spending but will have to cut that back at some point I suppose. Till at least I start making money. I will try to make my posts more powerful and easy to read.
Hi SallyAnne,
thank you for taking the time and leaving a comment. Fingers crossed
I’m all for utilitarian blog content. Here’s one on How to make a good blog post and earn more.
– Jonathan
Thanks for this honest, detailed , integrative ,explanation about blogging issues.
Hi Amira,
glad I could help. What are your blogging struggles?
– Jonathan
excellent issues altogether, you just gained a new reader.
What would you recommend about your post that you just made some days in the past?
Any positive?
Hi Dime,
actually, for me, the struggle was always about creating fresh equally unique content which is why I learned a lot once I started repurposing podcast content or my YT episodes. This saved my life 🙂
– Jonathan